Network Proxy (QiuChen Proxy)
QiuChenly App Store includes the QiuChen Proxy engine, which implements L3 transparent proxying based on a utun virtual network interface, providing Surge-like network takeover capabilities.
Status: Experimental feature, under active development.
This page focuses on configuring and using the QiuChen Proxy engine itself: enable the engine → follow the Quick Start three steps to import a subscription and get rules working, then on to advanced features such as policy-group switching, connection inspection, LAN gateway and port forwarding.
Haven't installed the app yet?
This page assumes you have already installed and initialized QiuChenly App Store. For downloading the app, removing the quarantine attribute, installing the daemon, granting Full Disk Access and the first-run setup, see Installation & Setup first.
Enabling the Proxy Engine
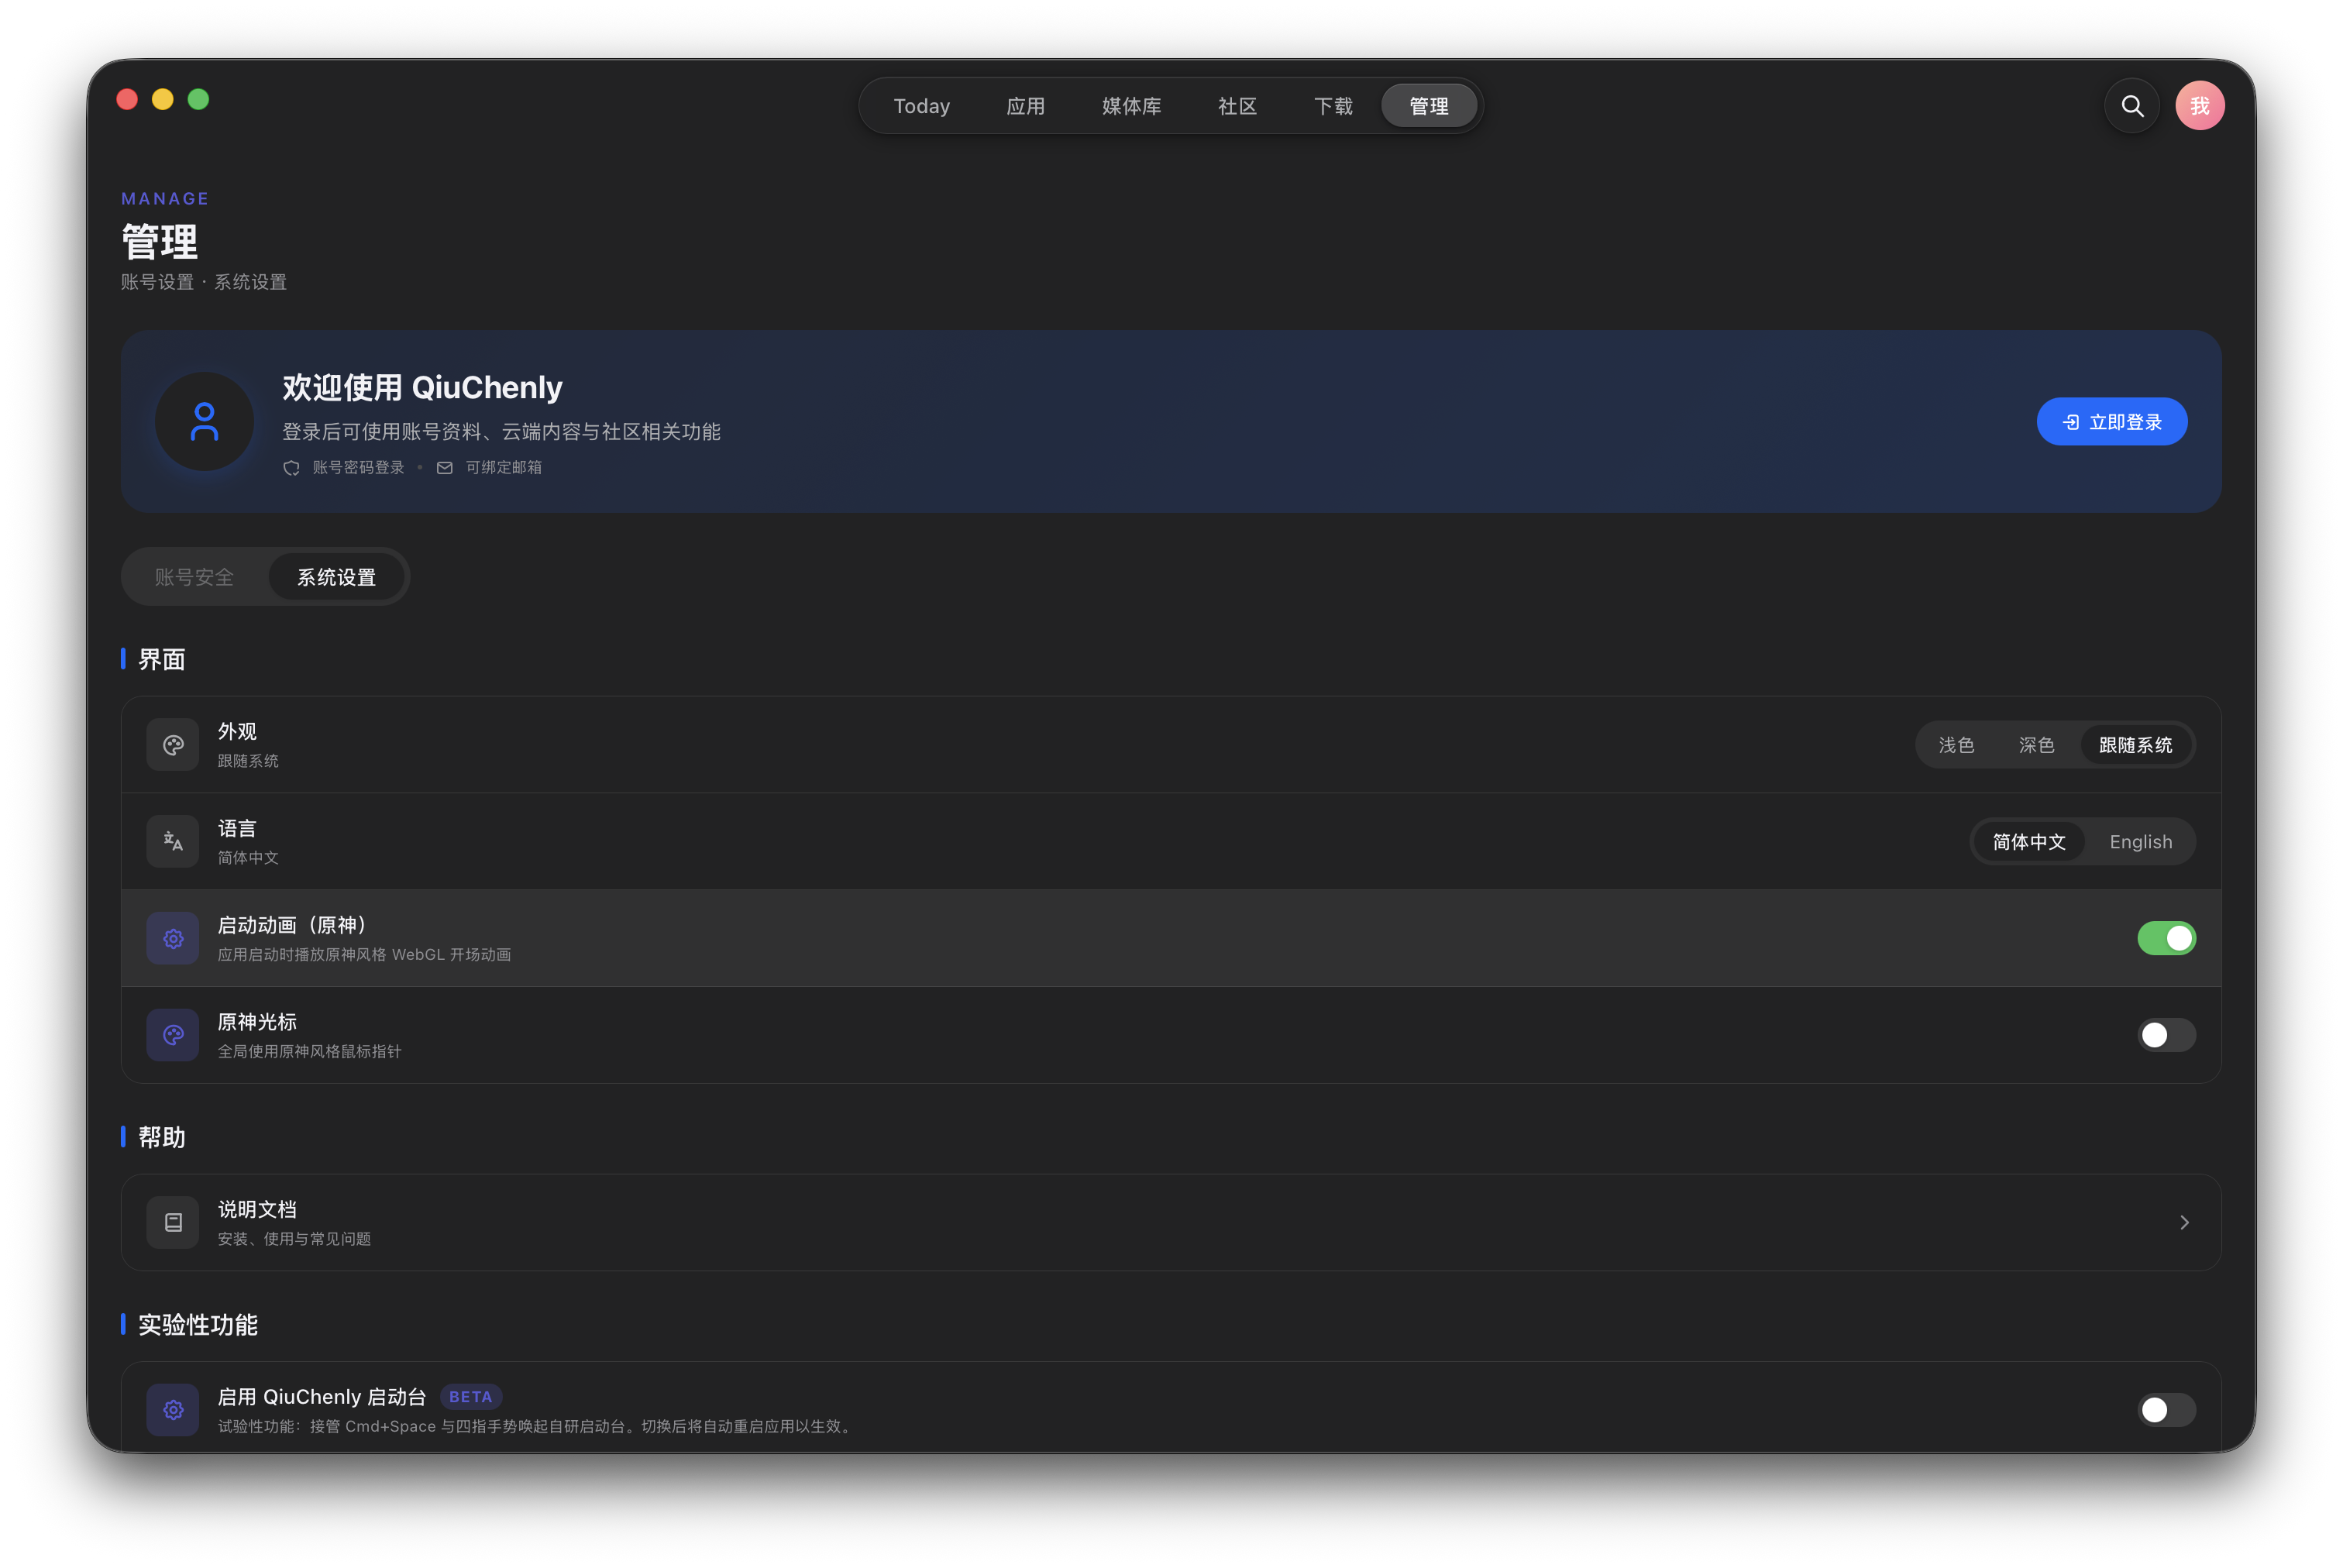
Go to Manage → System Settings → Experimental Features and turn on the "Enable QiuChenly Proxy" toggle. The daemon's built-in netproxy engine automatically handles the utun virtual NIC and globally takes over system traffic — effective immediately, no restart, no password required. Configuration is stored in the ~/.qiuchenly/ directory and hot reloads automatically.

Turn off the opening animation
If you don't want the Genshin-style door animation on every launch, disable "Opening Animation (Genshin)" in Manage → System Settings → Interface.
Quick Start
Once the proxy engine is on, three steps get you running: open the management UI → add a subscription → configure rules.
Step 1: Open the Proxy Management GUI
Go to Apps → Featured Collections and click the "QiuChenly Proxy" card to open the native proxy management interface.
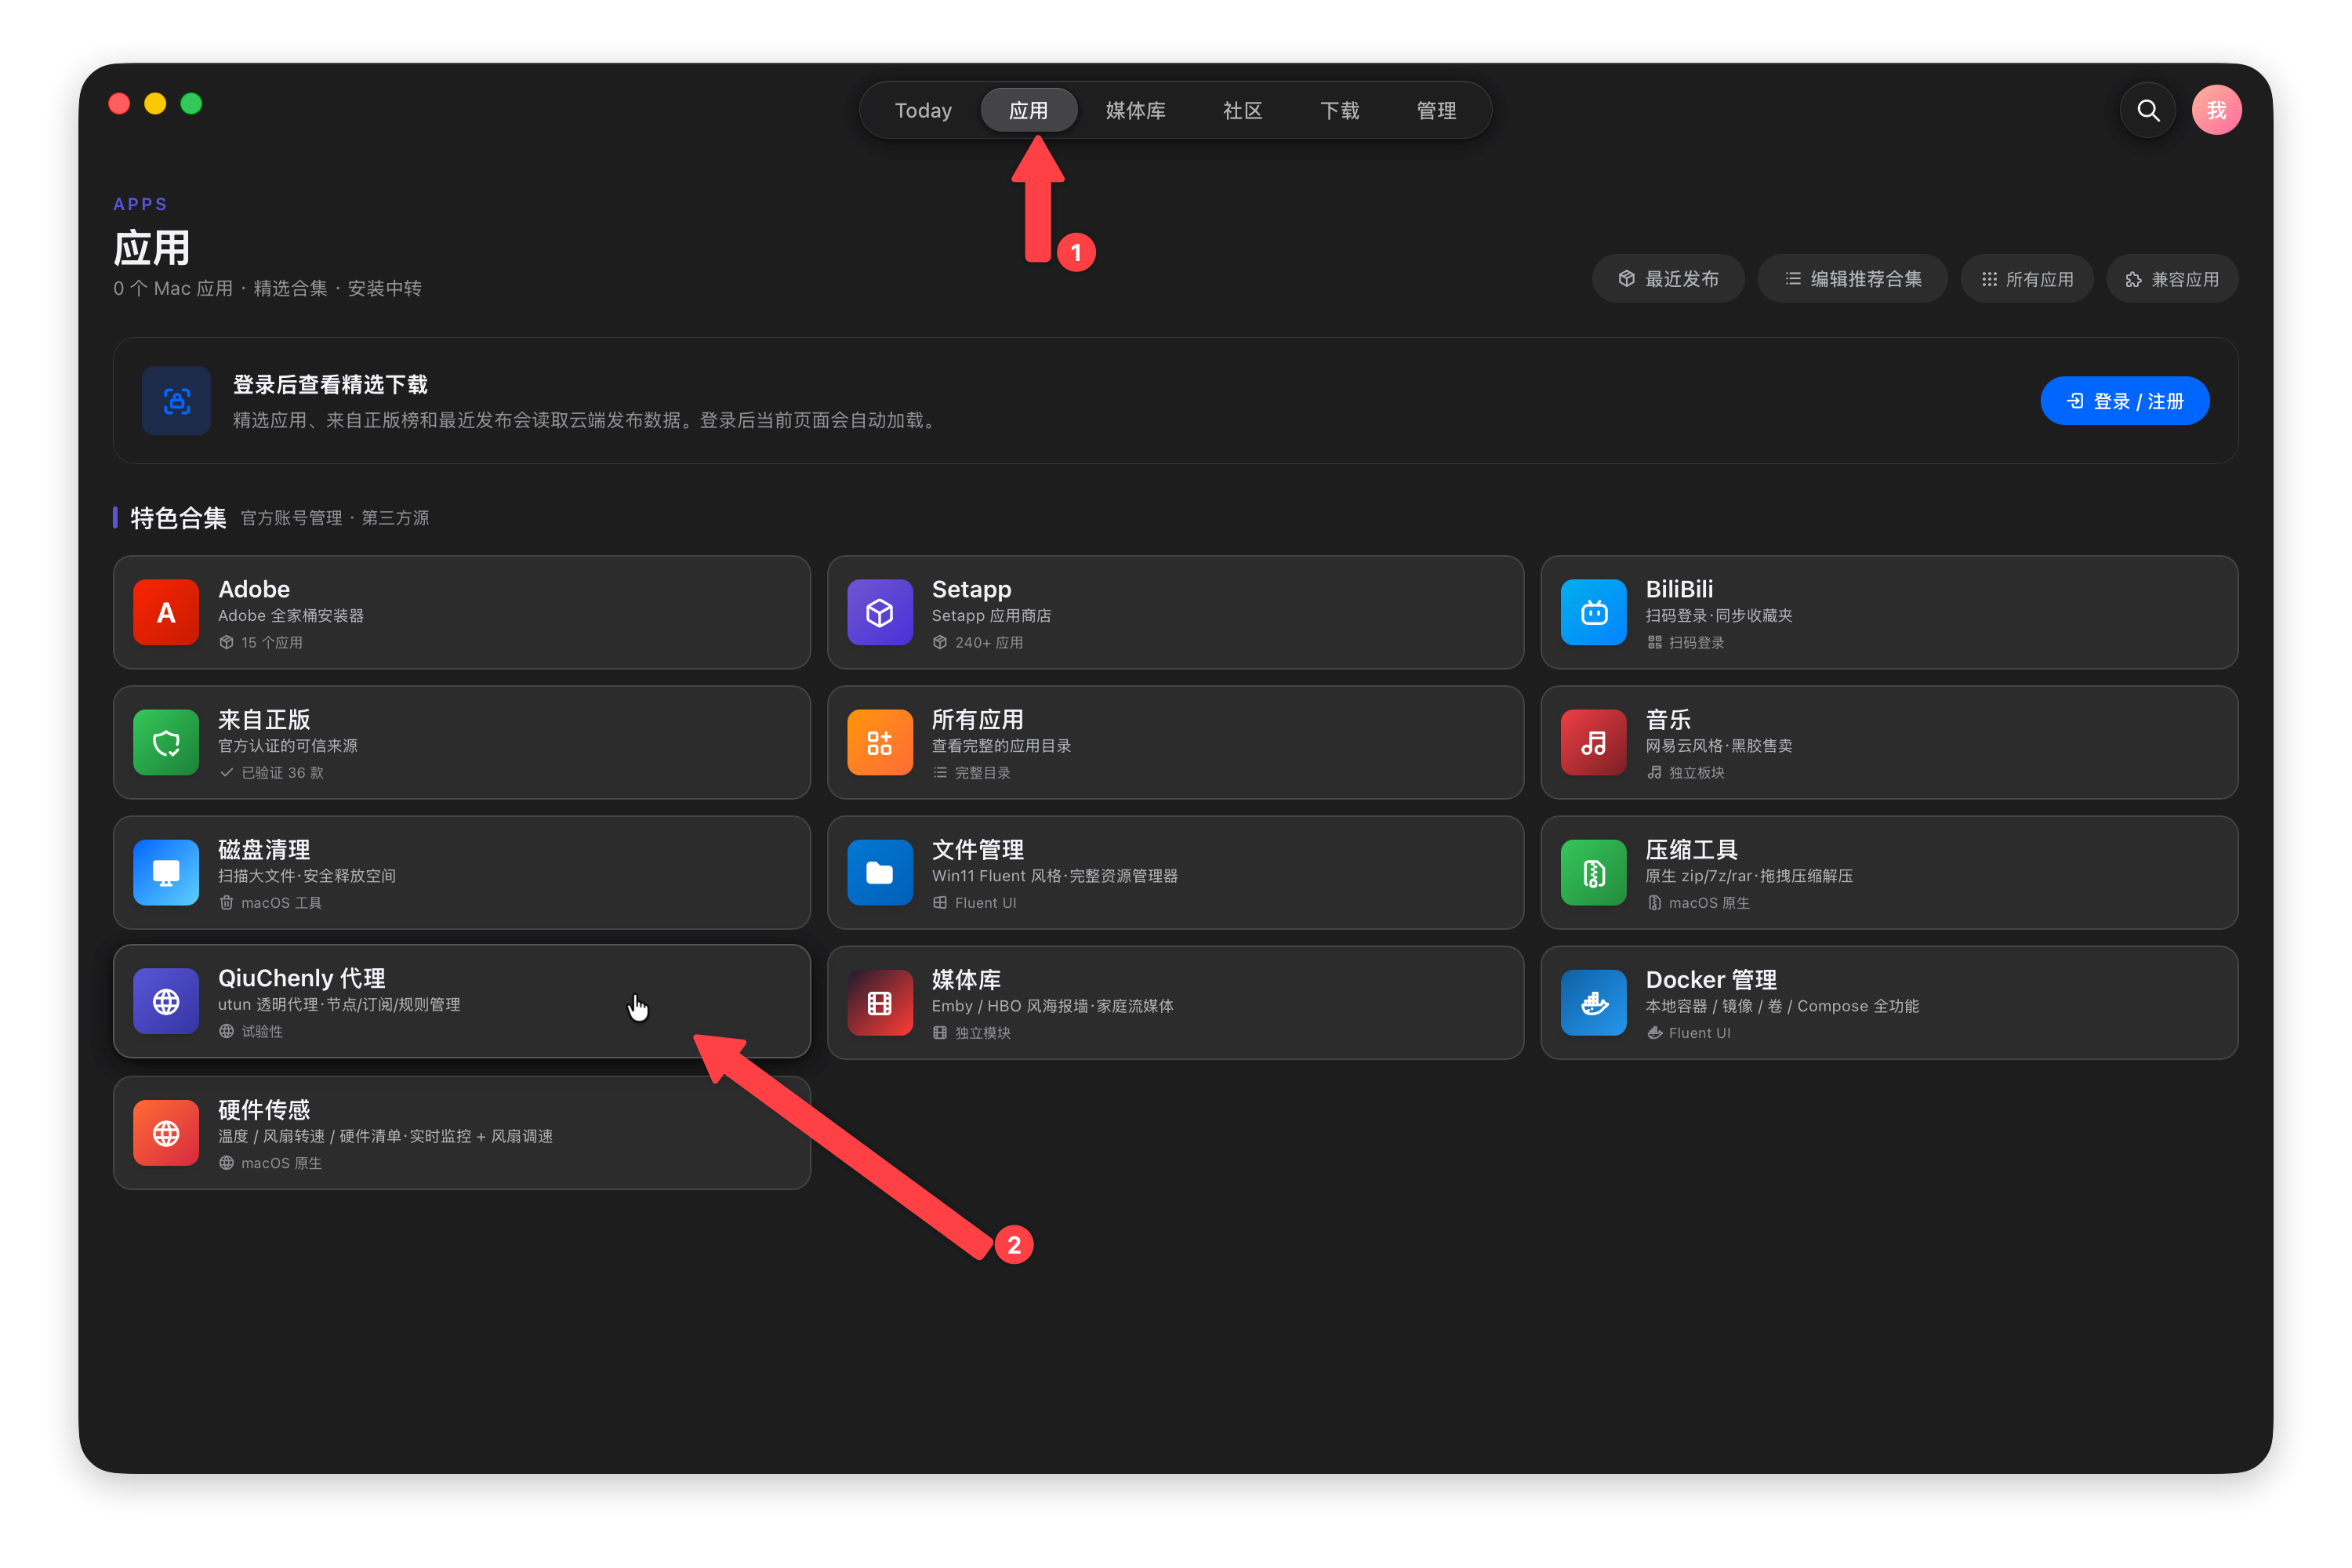
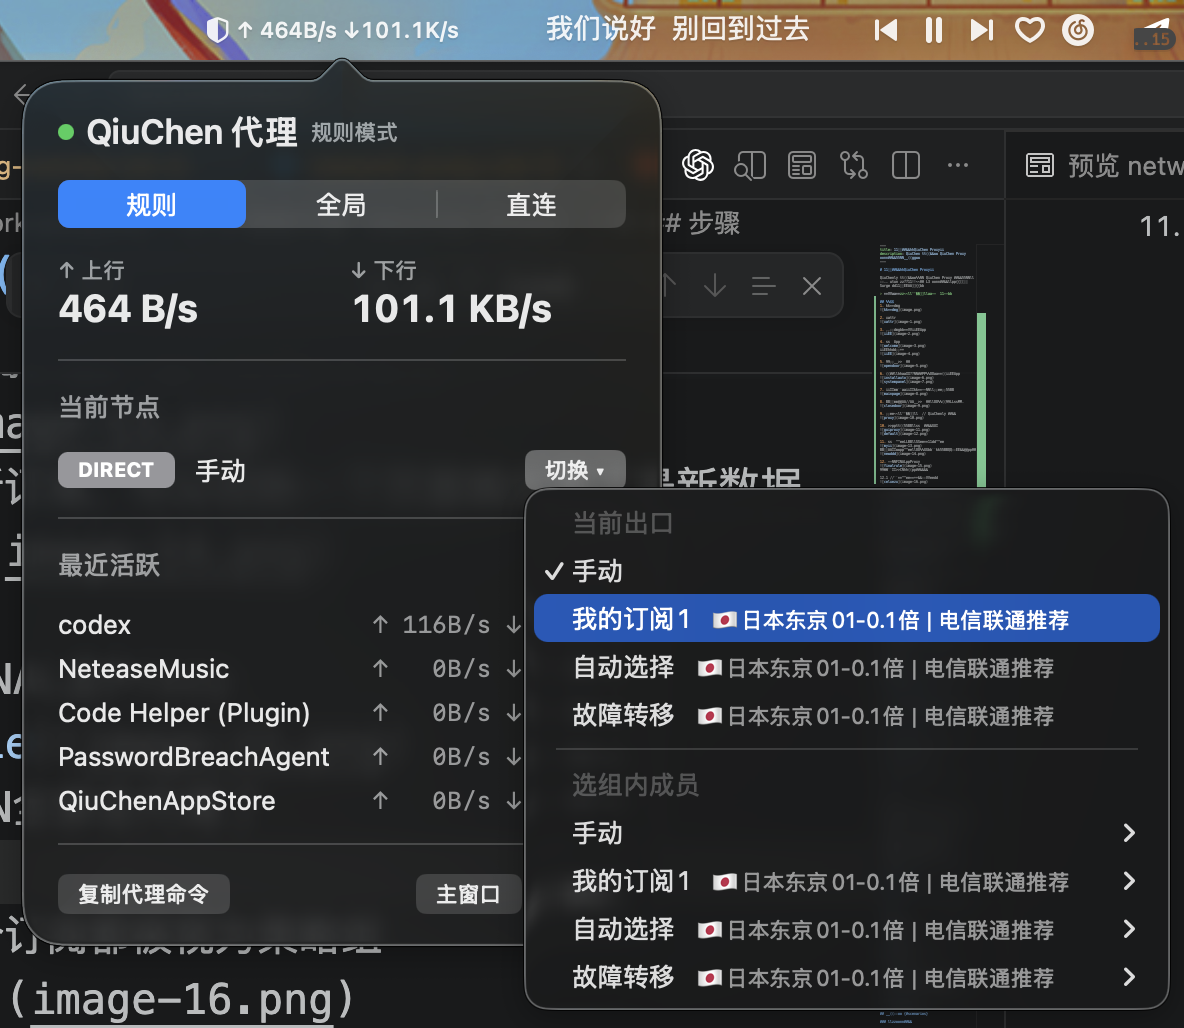
The main interface provides modules such as Overview, Connection Inspection, Nodes, Policy Groups, Rules, Port Forwarding, DNS and Gateway. The menu-bar icon also offers a quick panel where you can see real-time up/down speeds, the current node, and switch nodes quickly.

Step 2: Add a Subscription
- In the left navigation, open the Subscriptions page and click "Add Subscription"
- Enter the subscription URL, update interval (seconds) and a name, then click Save
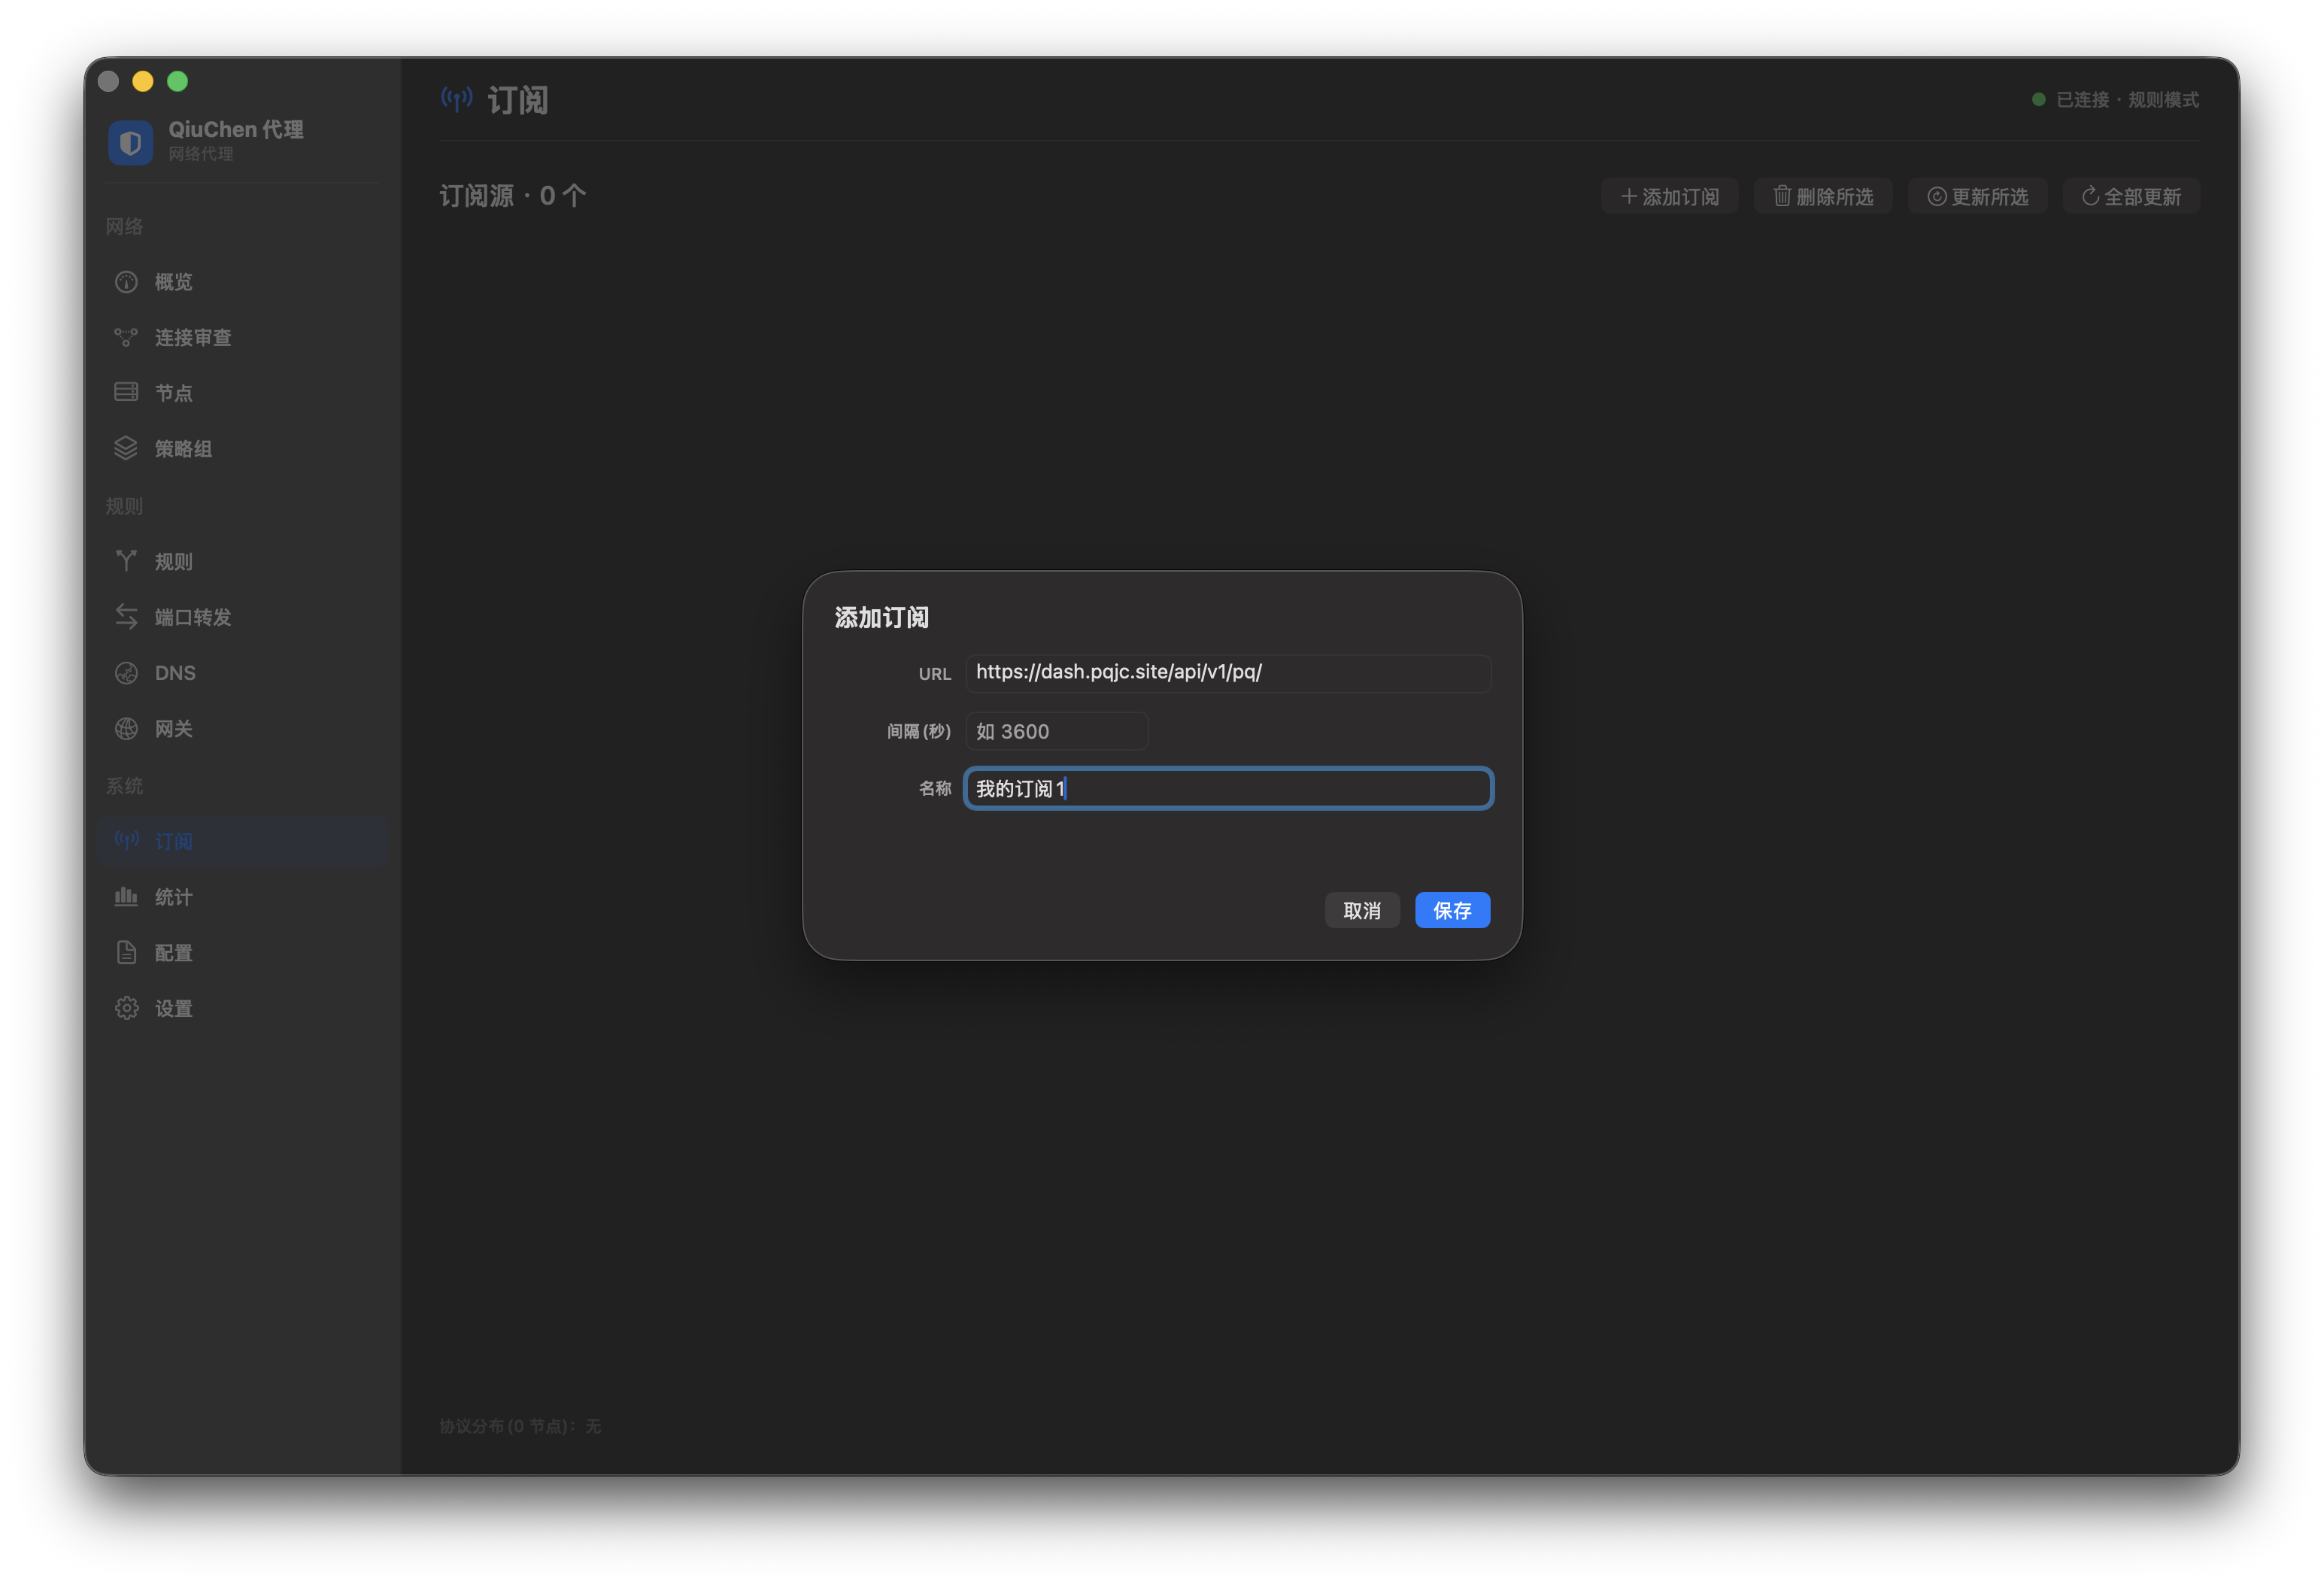
Nodes in the subscription are parsed and imported automatically, and the node count and protocol distribution are shown (e.g. VLESS 61 · HYSTERIA2 25 · SS 2).
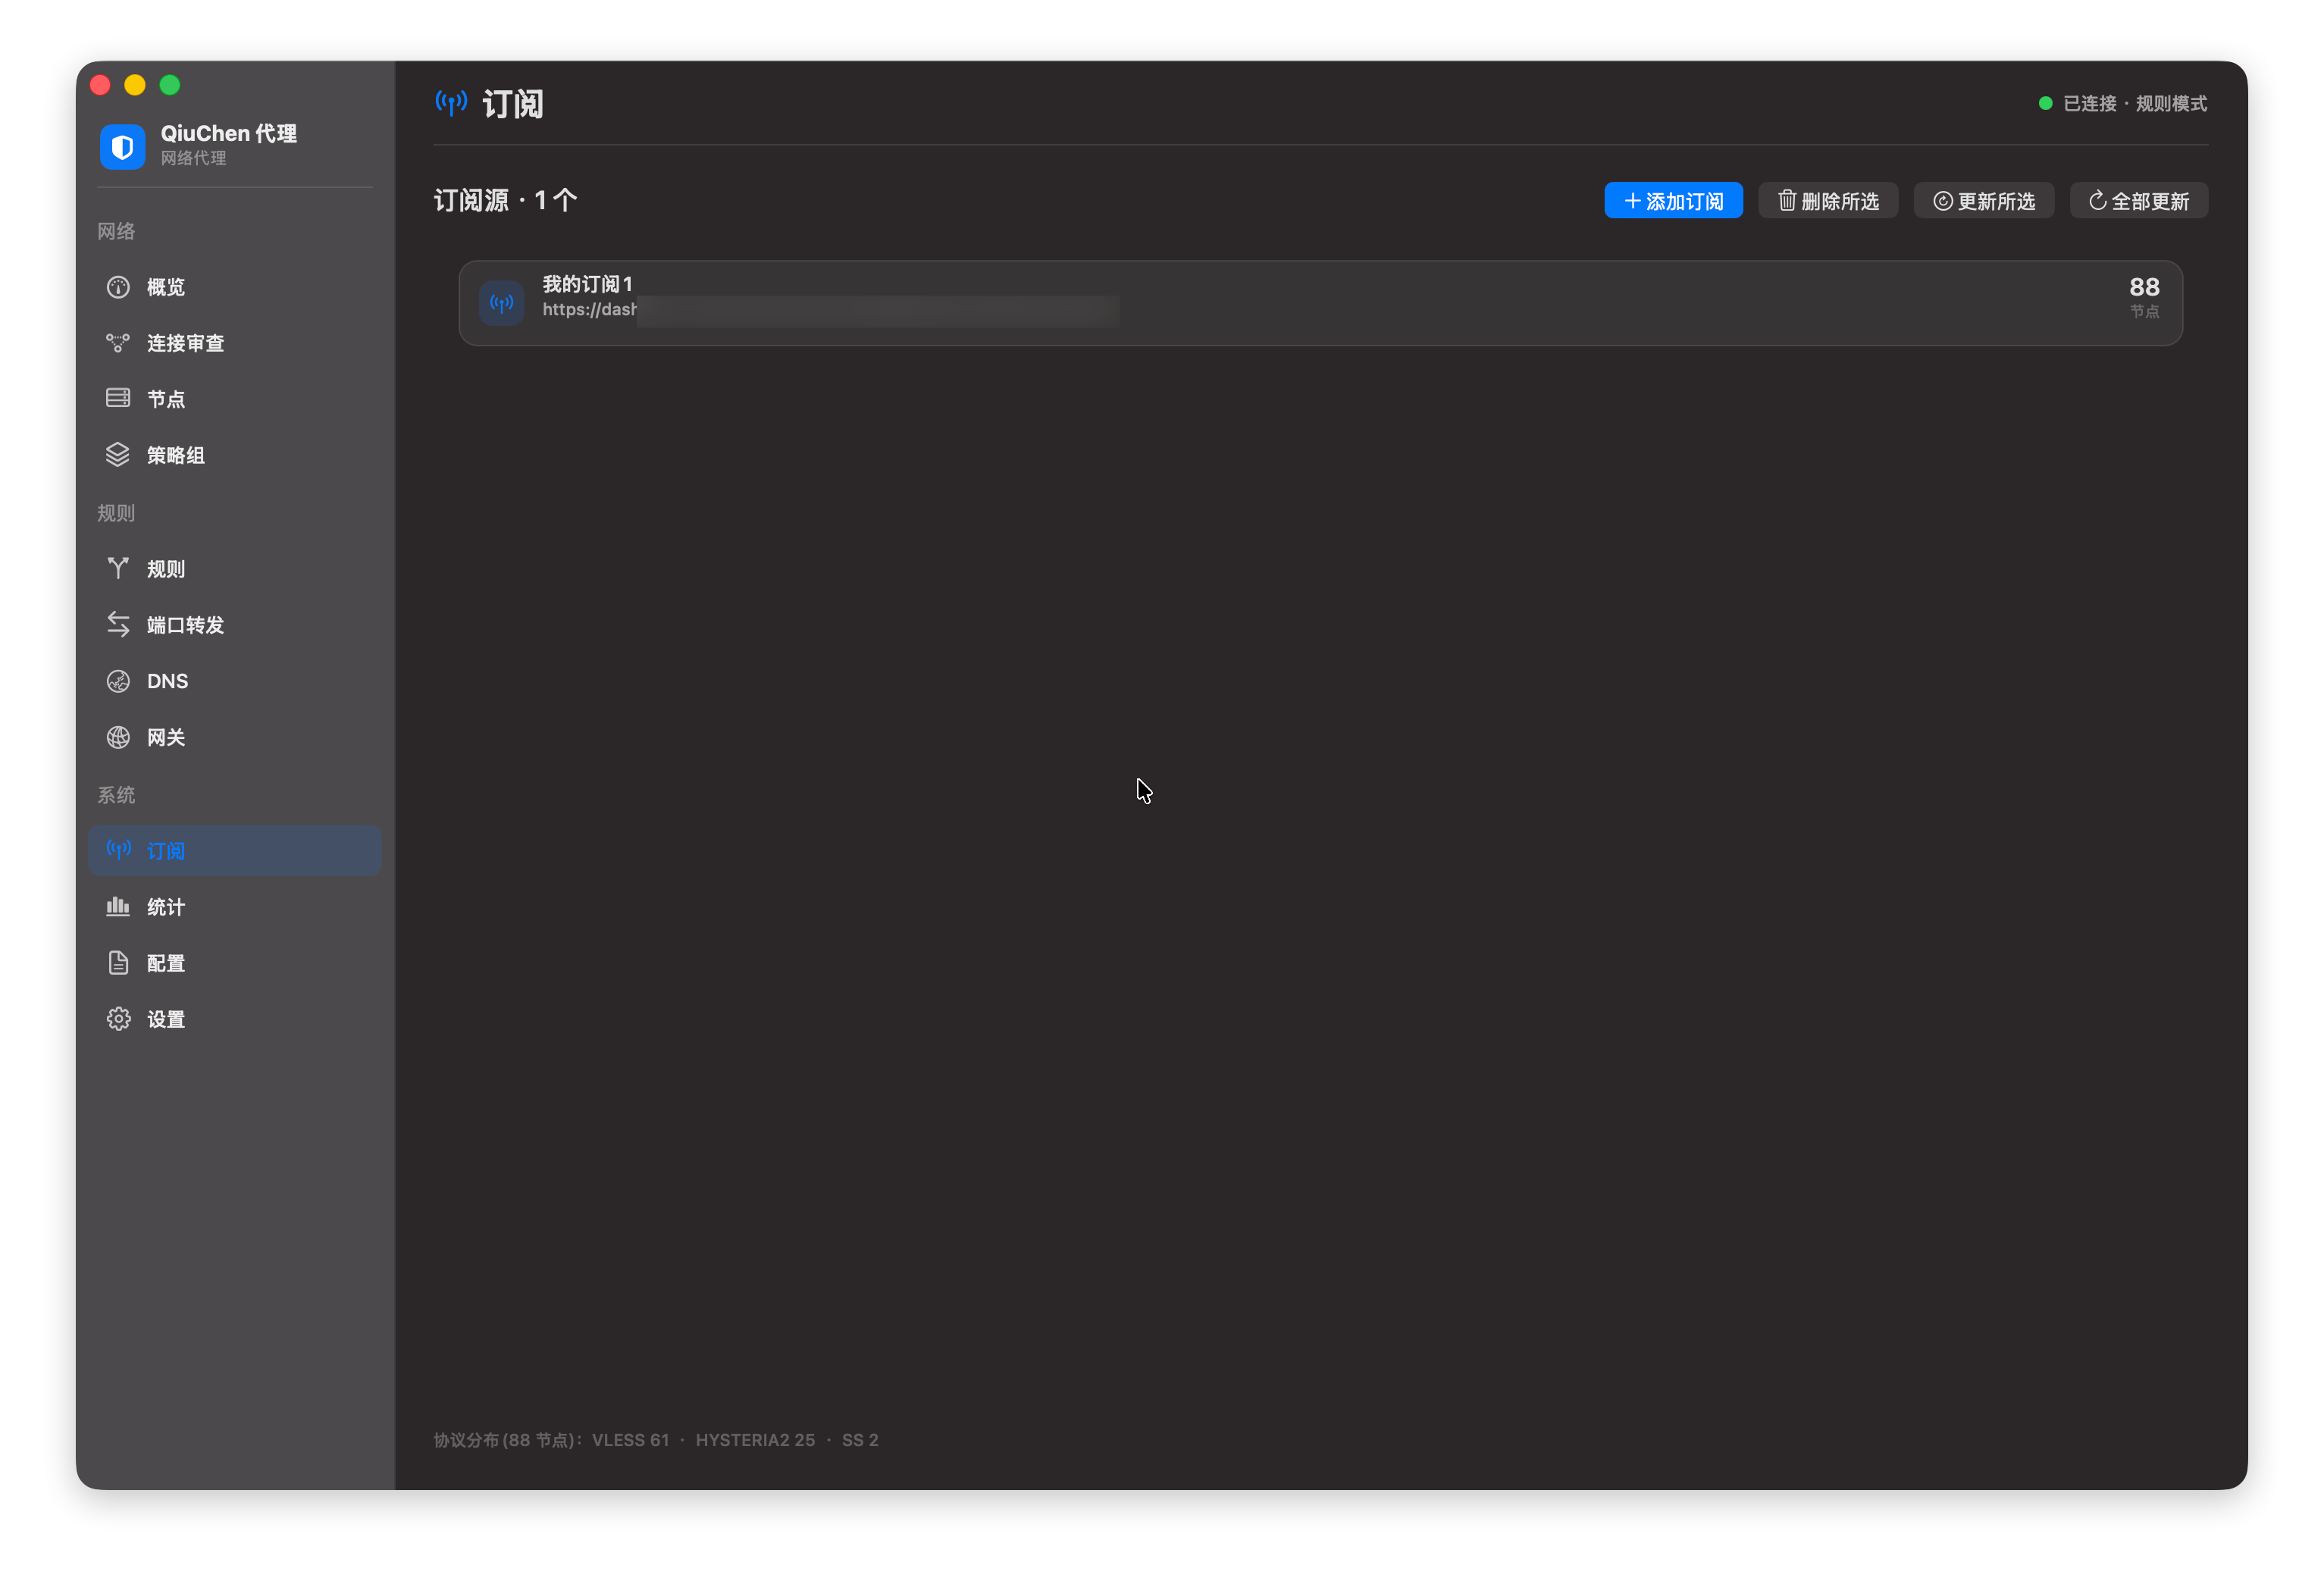
If it doesn't refresh immediately after importing, switch pages once to see the latest data.
Step 3: Configure Rules
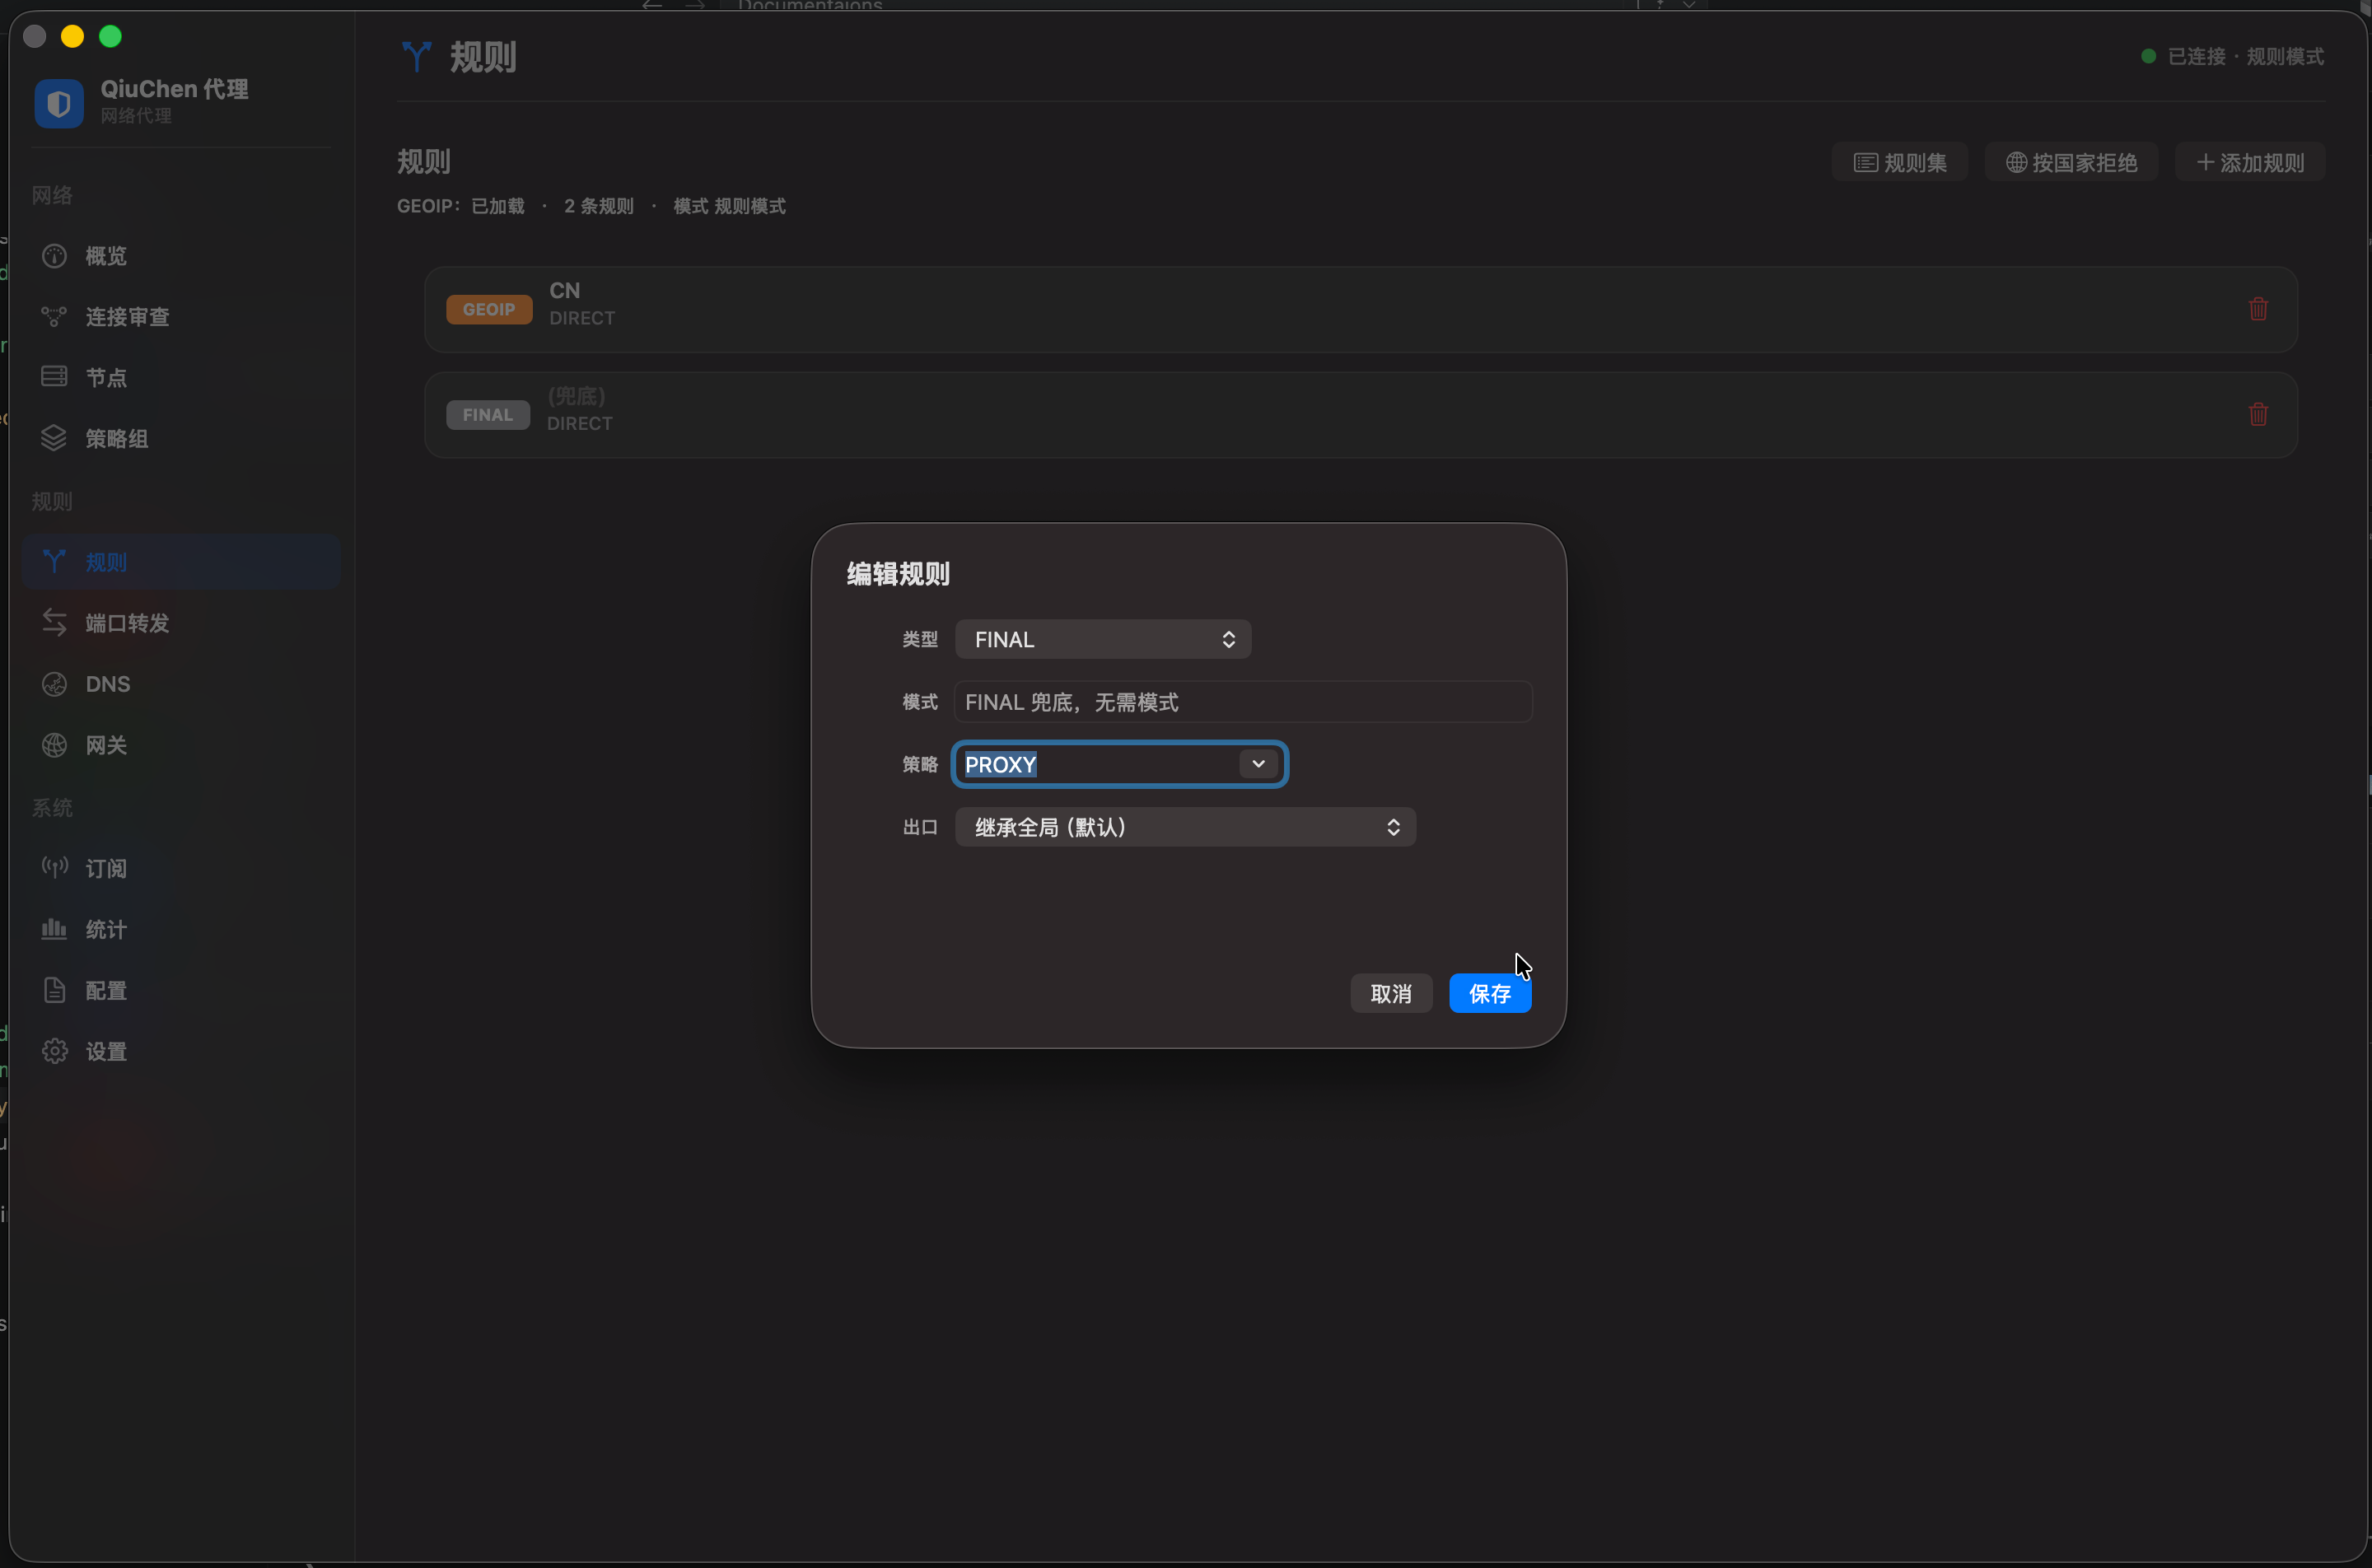
After importing, the system uses the default rule group. To make "all non-domestic traffic go through the proxy", go to the Rules page, change the FINAL fallback rule's policy to PROXY and save:
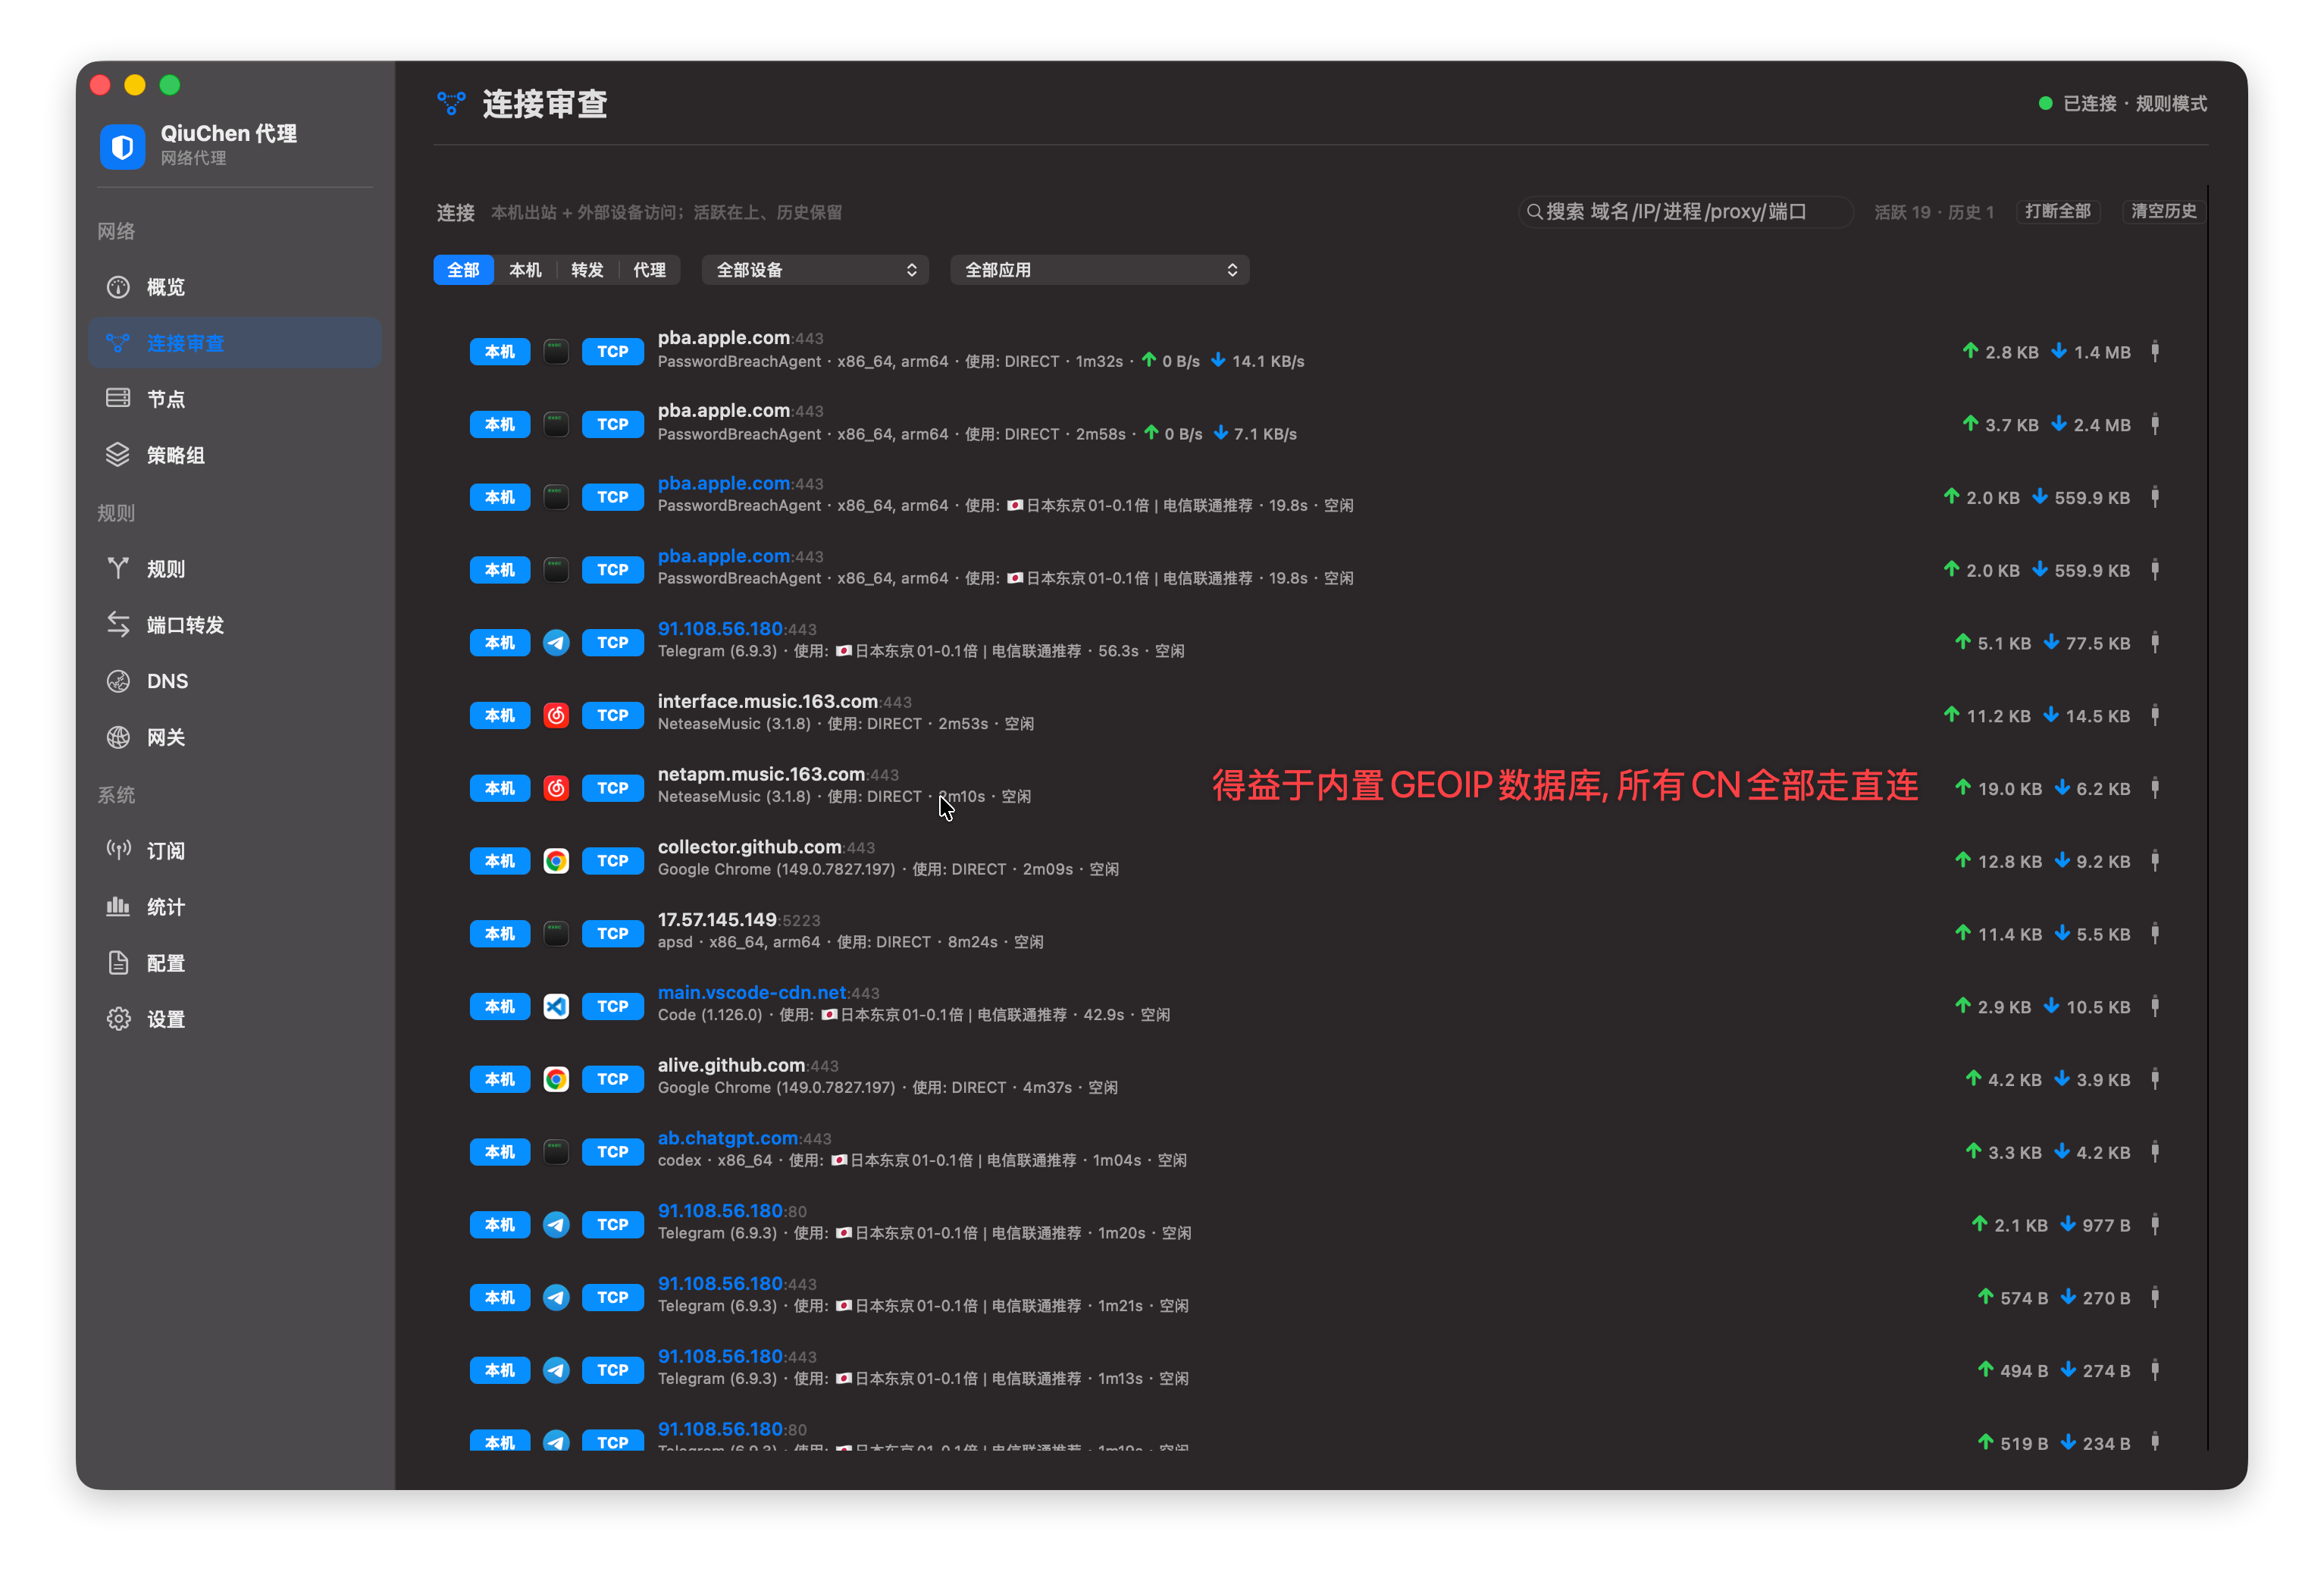
- CN (GEOIP) → DIRECT: thanks to the built-in GEOIP database, domestic IPs connect directly
- FINAL → PROXY: all other traffic goes through the proxy
After enabling, system traffic is routed automatically by rule — domestic sites connect directly, blocked sites go through the proxy.
Verify the Proxy Works
Open a browser and visit https://www.google.com. If it loads normally, the proxy is working. The proxy management interface shows real-time connection logs and traffic statistics.
Troubleshooting
- Cannot open foreign sites: check whether the subscription nodes are valid; run a manual speed test in the node list
- Domestic sites are slow: check whether the direct-connect rules are correct and whether domestic DNS is configured
- Proxy toggle is greyed out: confirm the daemon is running (
launchctl list | grep hayaku)
Policy Groups & Node Switching
Every subscription is treated as a policy group. In addition to subscription groups, the system ships with built-in groups such as Manual (SELECT), Auto-select (URL-TEST) and Fallback (FALLBACK).
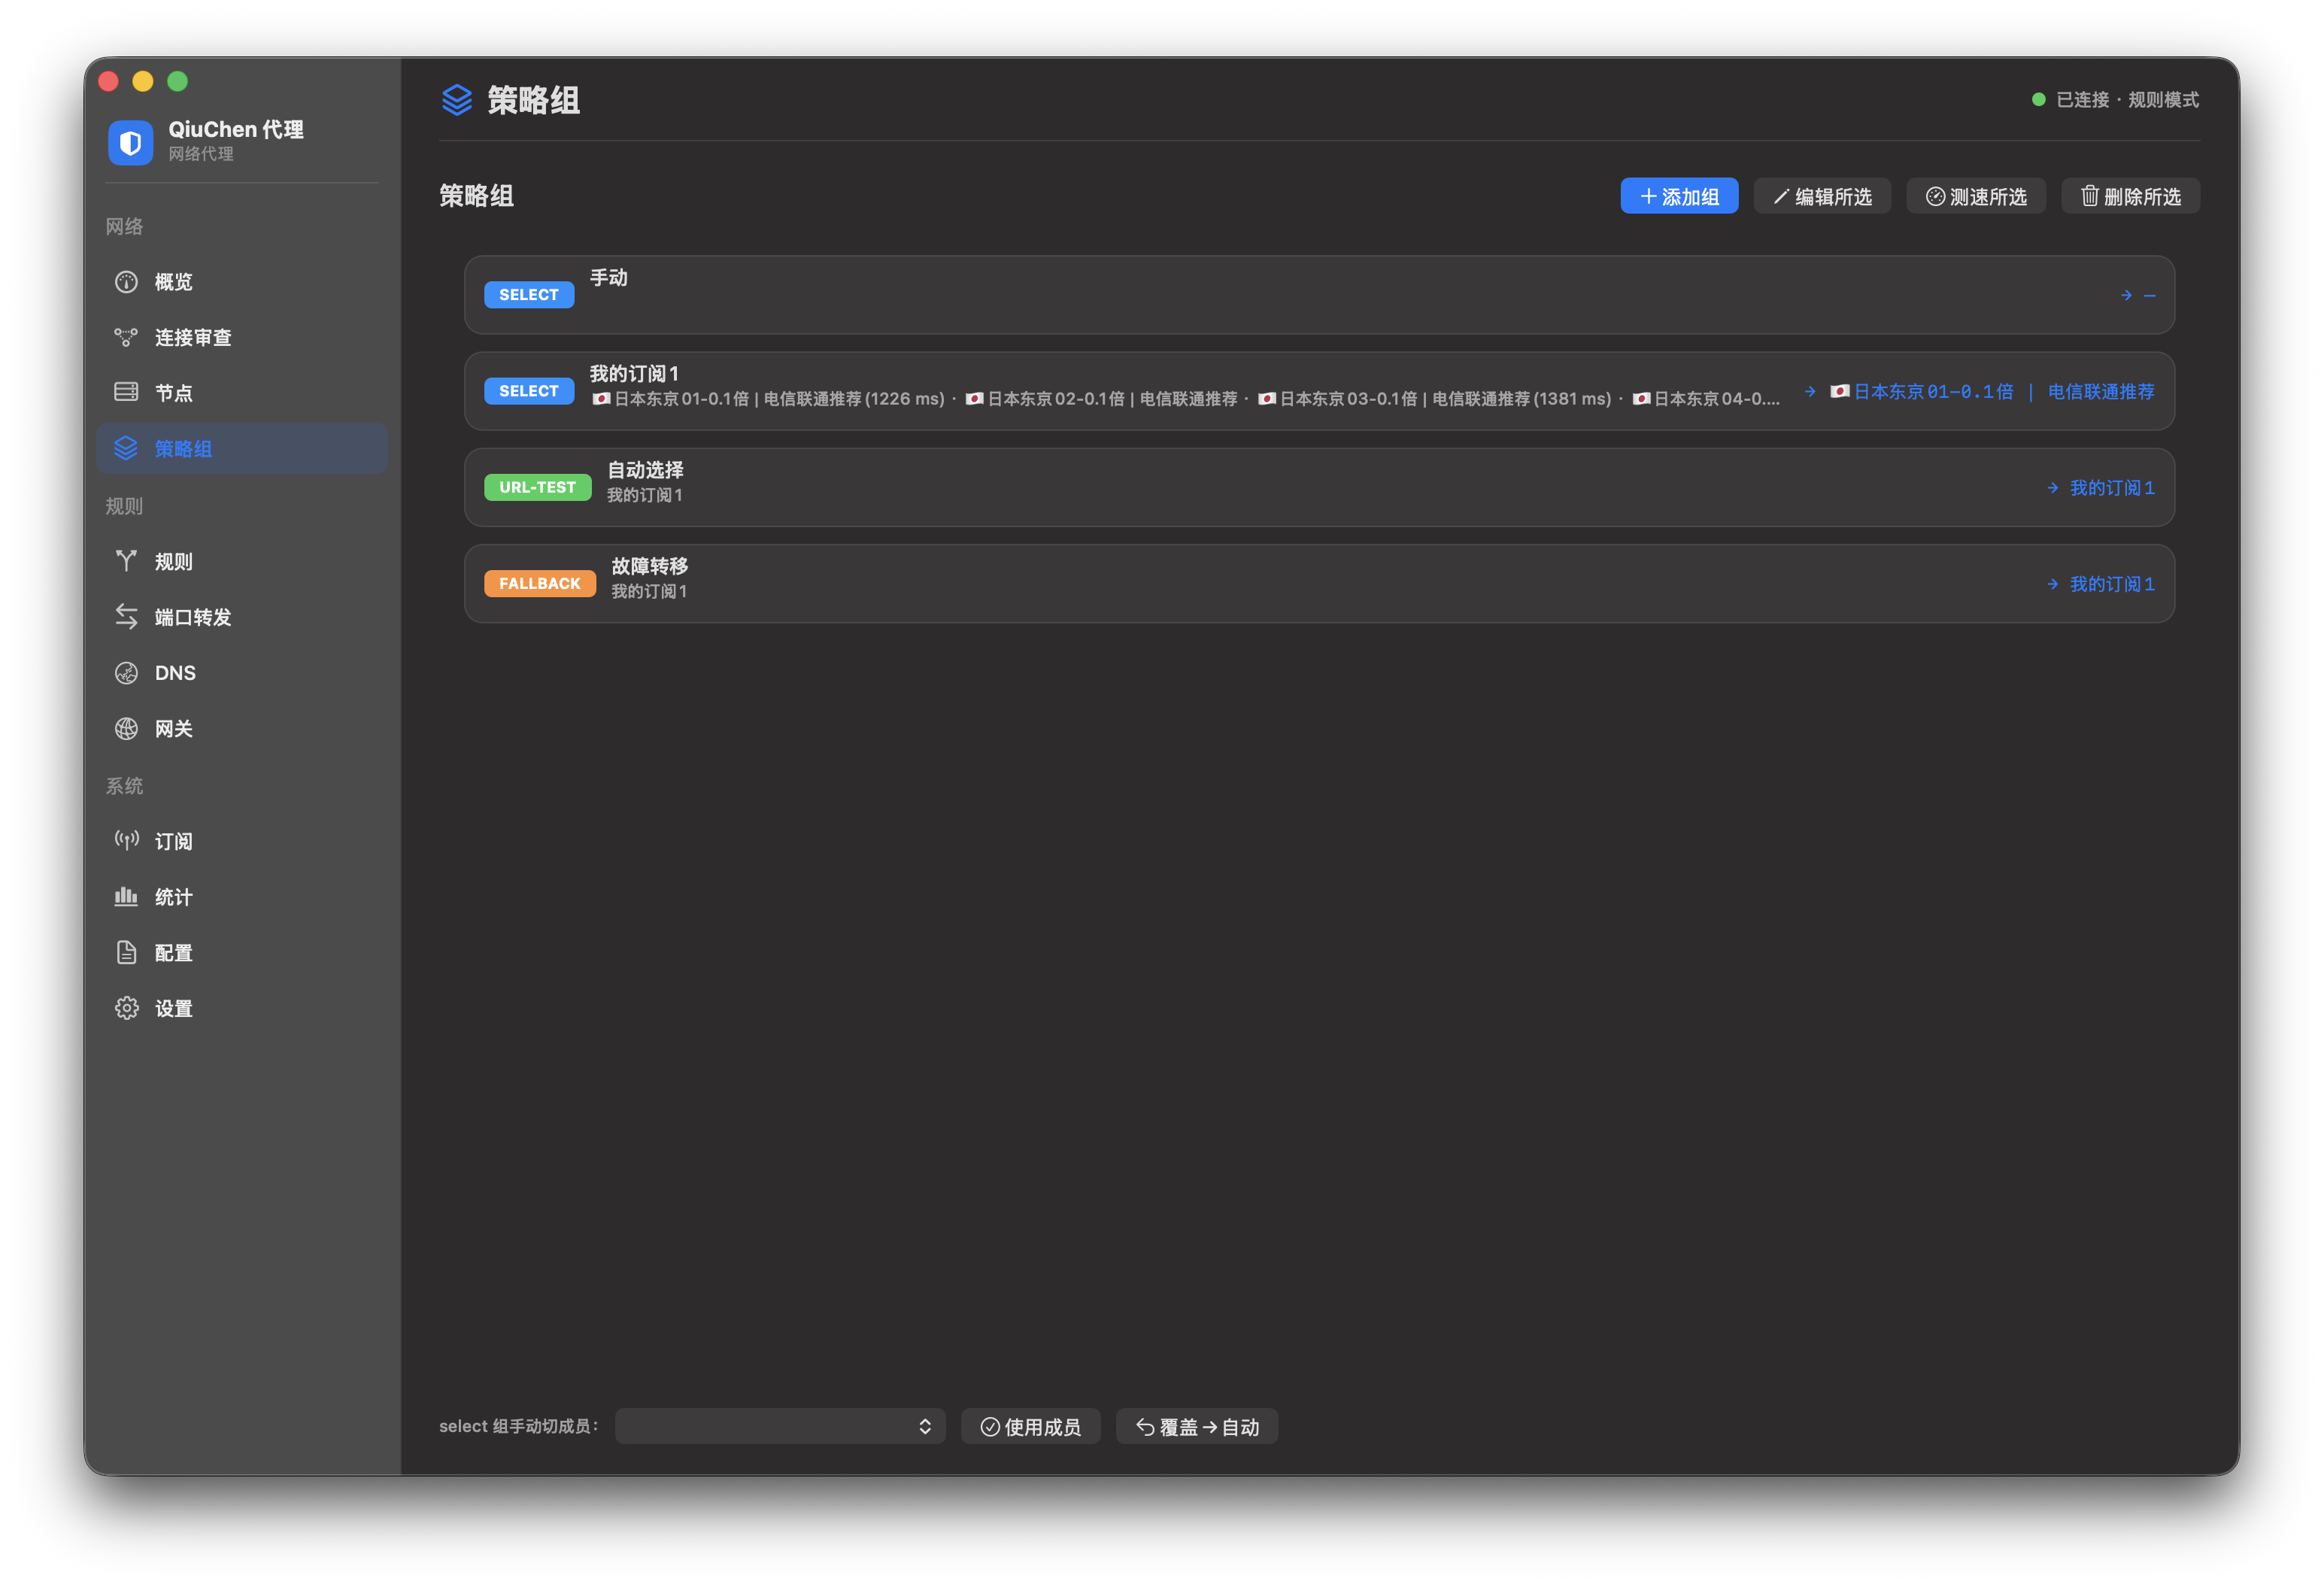
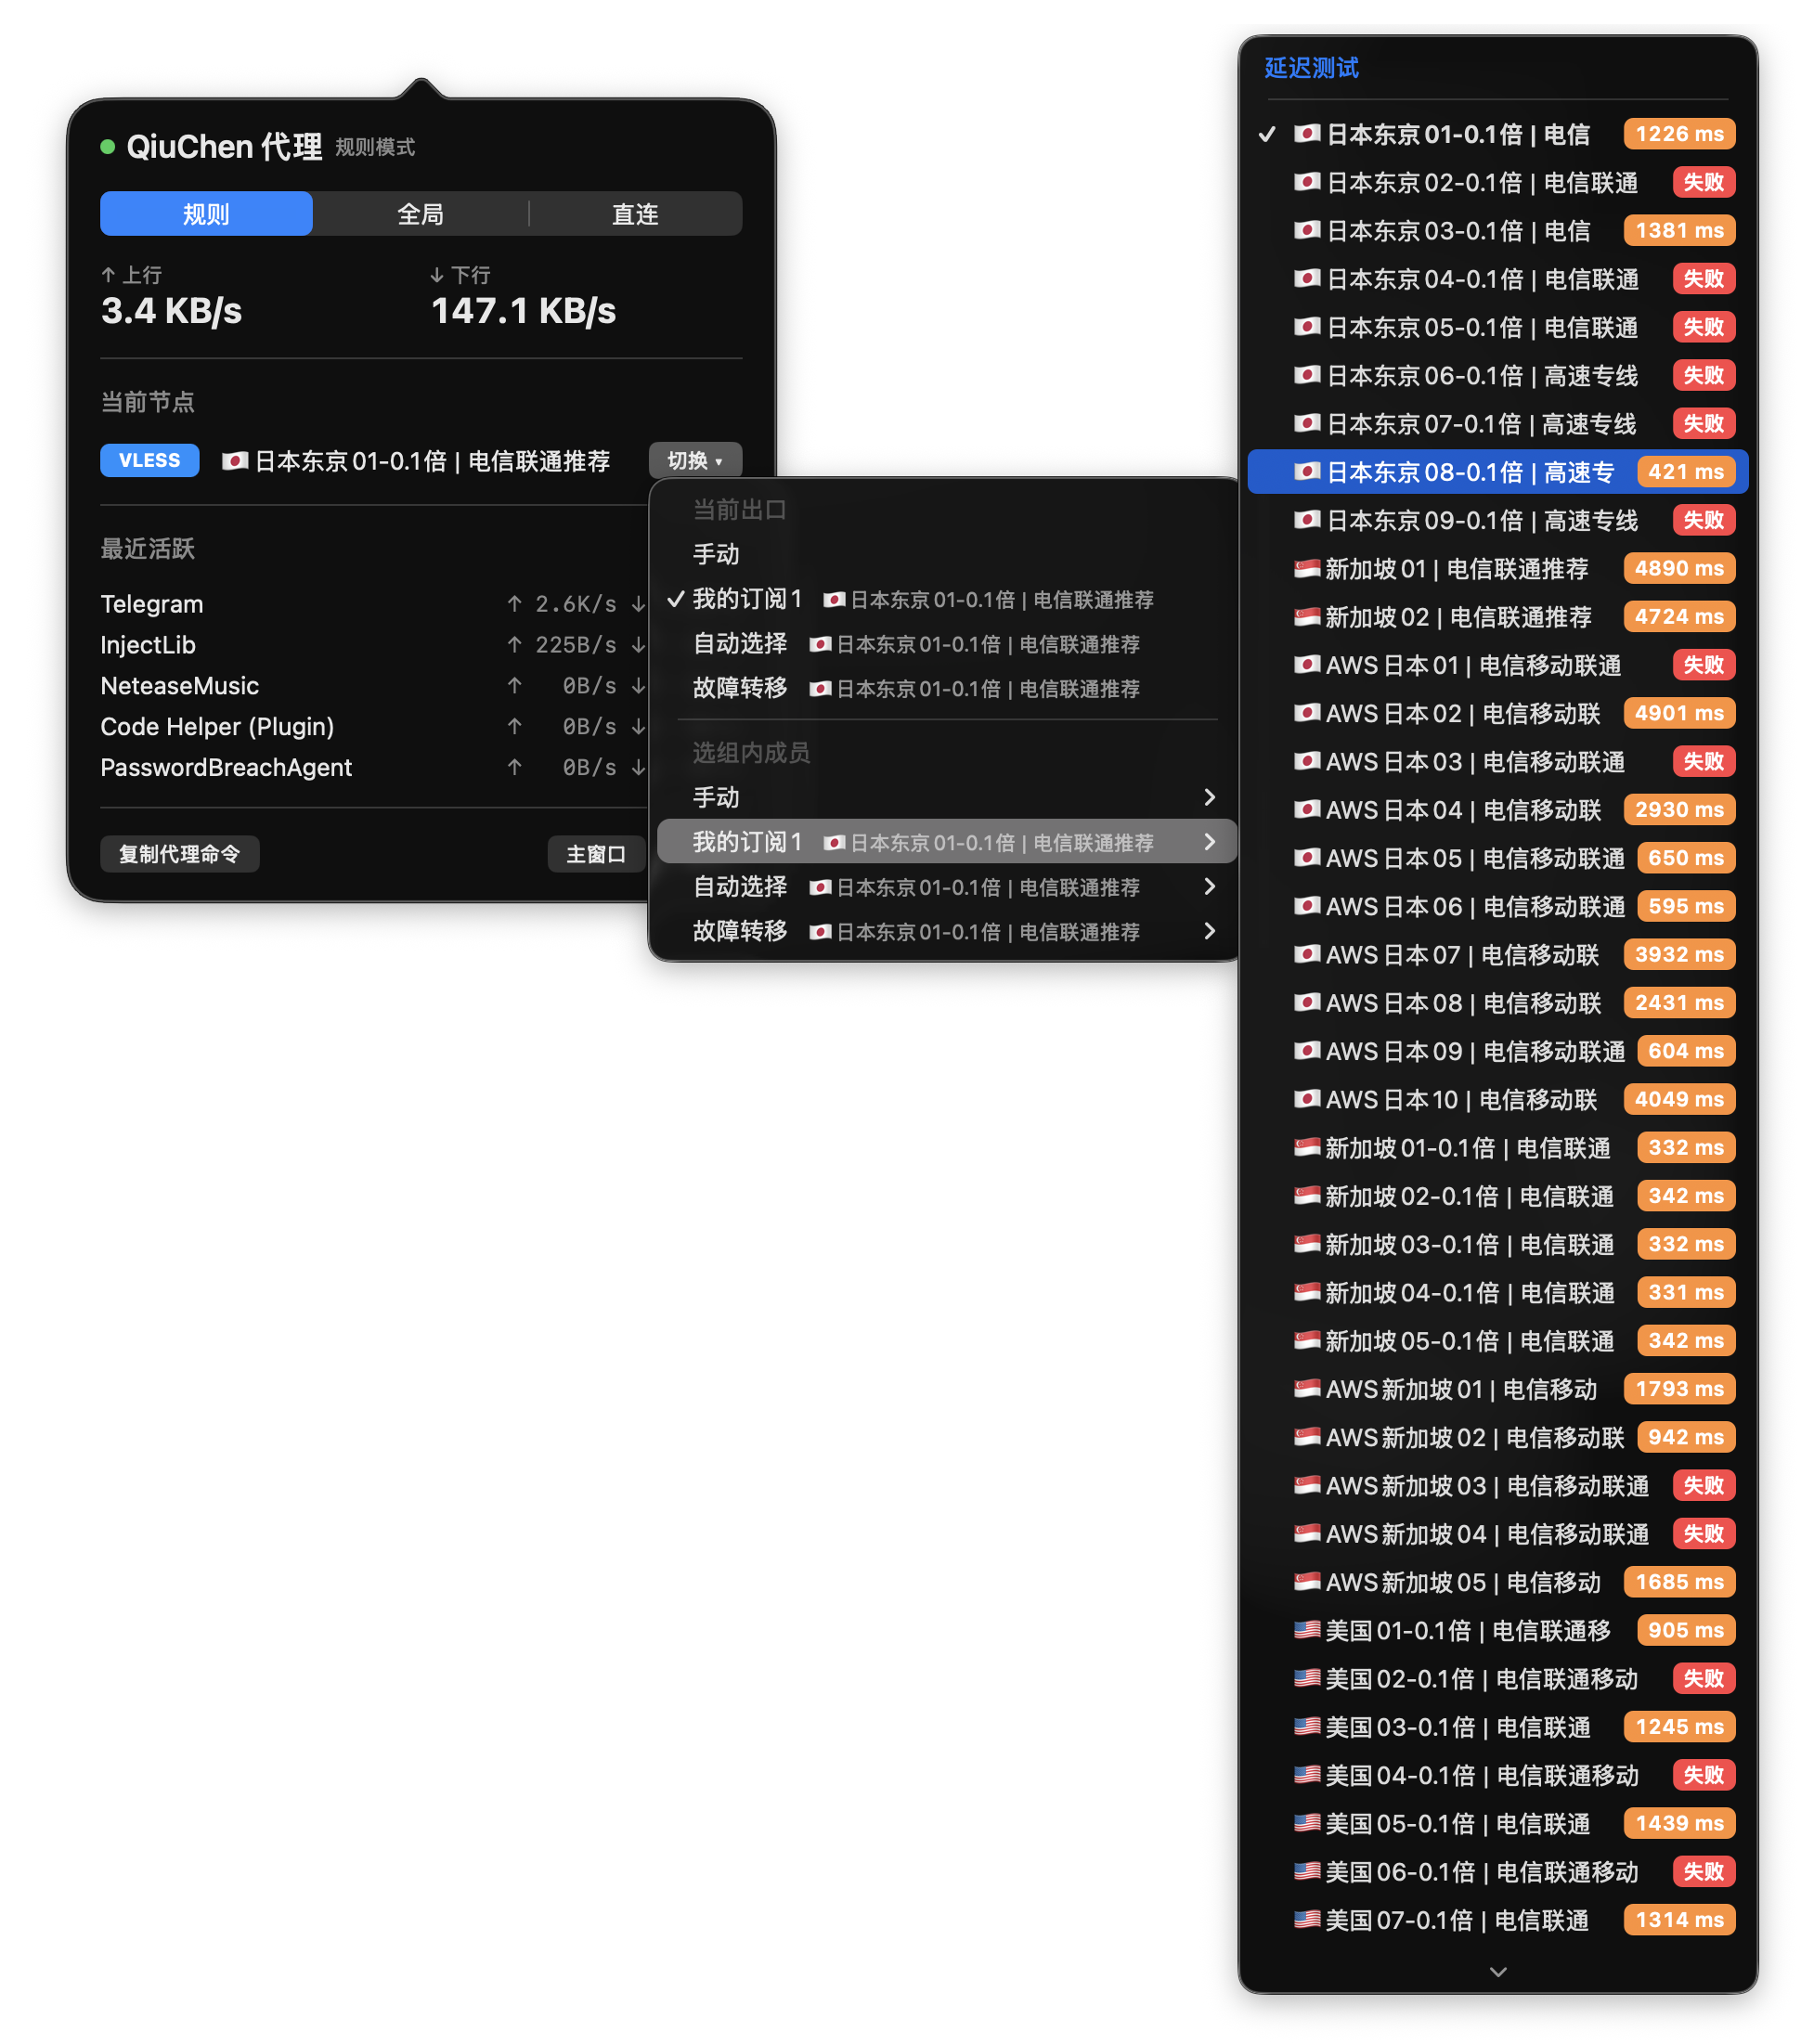
In the menu-bar quick panel, click "Switch" to set the current outbound to your subscription policy group or any member within it.
While switching the outbound you can also run a latency test on nodes to pick a low-latency, stable node.
The Manual policy group lets you pull in stable nodes from other groups for quick switching of common destinations. If you'd rather not fiddle with it, keep the defaults.
Connection Inspection
Connection Inspection shows the process, target, outbound and direction of every connection in real time, and distinguishes three attribution categories: local machine / LAN device / external. Thanks to the built-in GEOIP database, all CN traffic connects directly.
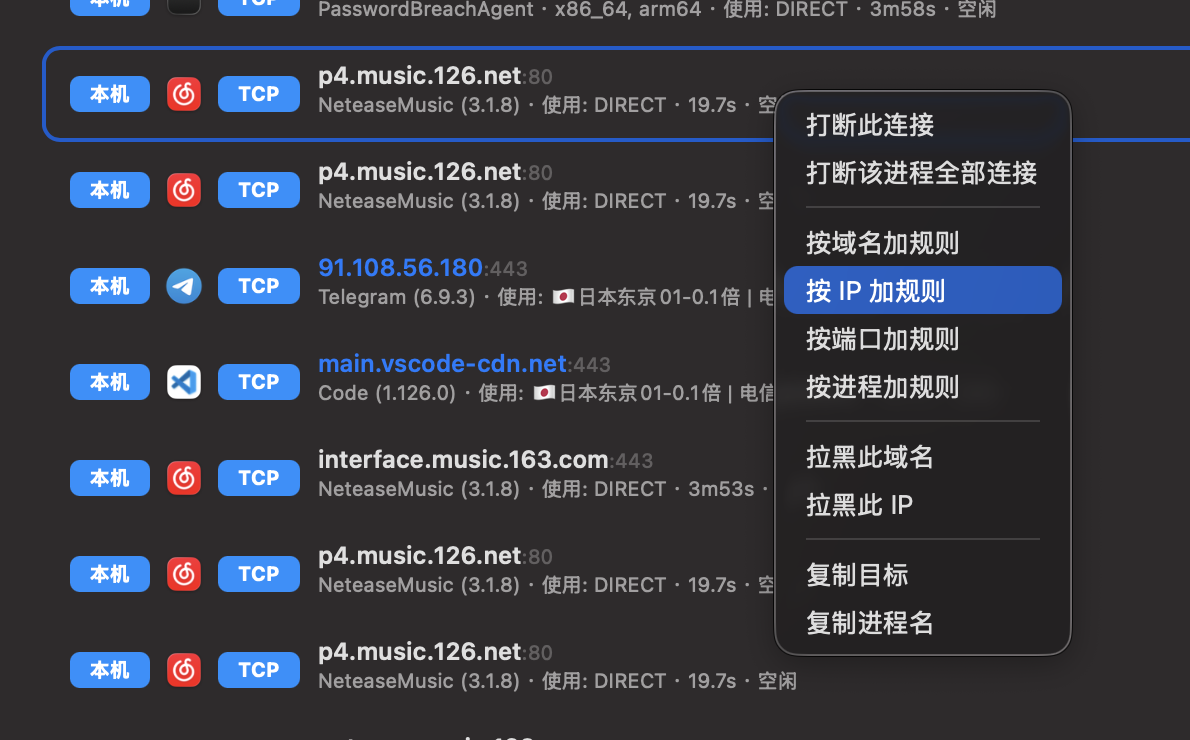
If the default rules aren't granular enough, right-click a connection for targeted control: add a rule by domain / IP / port / process, or block a domain / IP directly.
Outbound Proxy & LAN Gateway
There are two ways to let other devices on the LAN (iPhone / Android / PC) go through this machine's proxy.
DHCP is not fully tested
As of now, the DHCP feature on the Gateway page has not been fully tested. Do not enable it on your own, to avoid breaking your network in a way that's hard to recover from.
Option 1: Expose HTTP / SOCKS5 Externally
Go to Settings → Outbound Proxy Service, switch the listener to "Open to External", and enable HTTP / SOCKS5 (default ports 7890 / 7891; HTTP and SOCKS5 share one listener, only the port differs). Other devices just point their proxy at <this machine's IP>:<port>.

Option 2: L3 Transparent Forwarding Takeover
Go to the Gateway page, enable L3 Transparent Forwarding, and check the outward-facing LAN NIC.
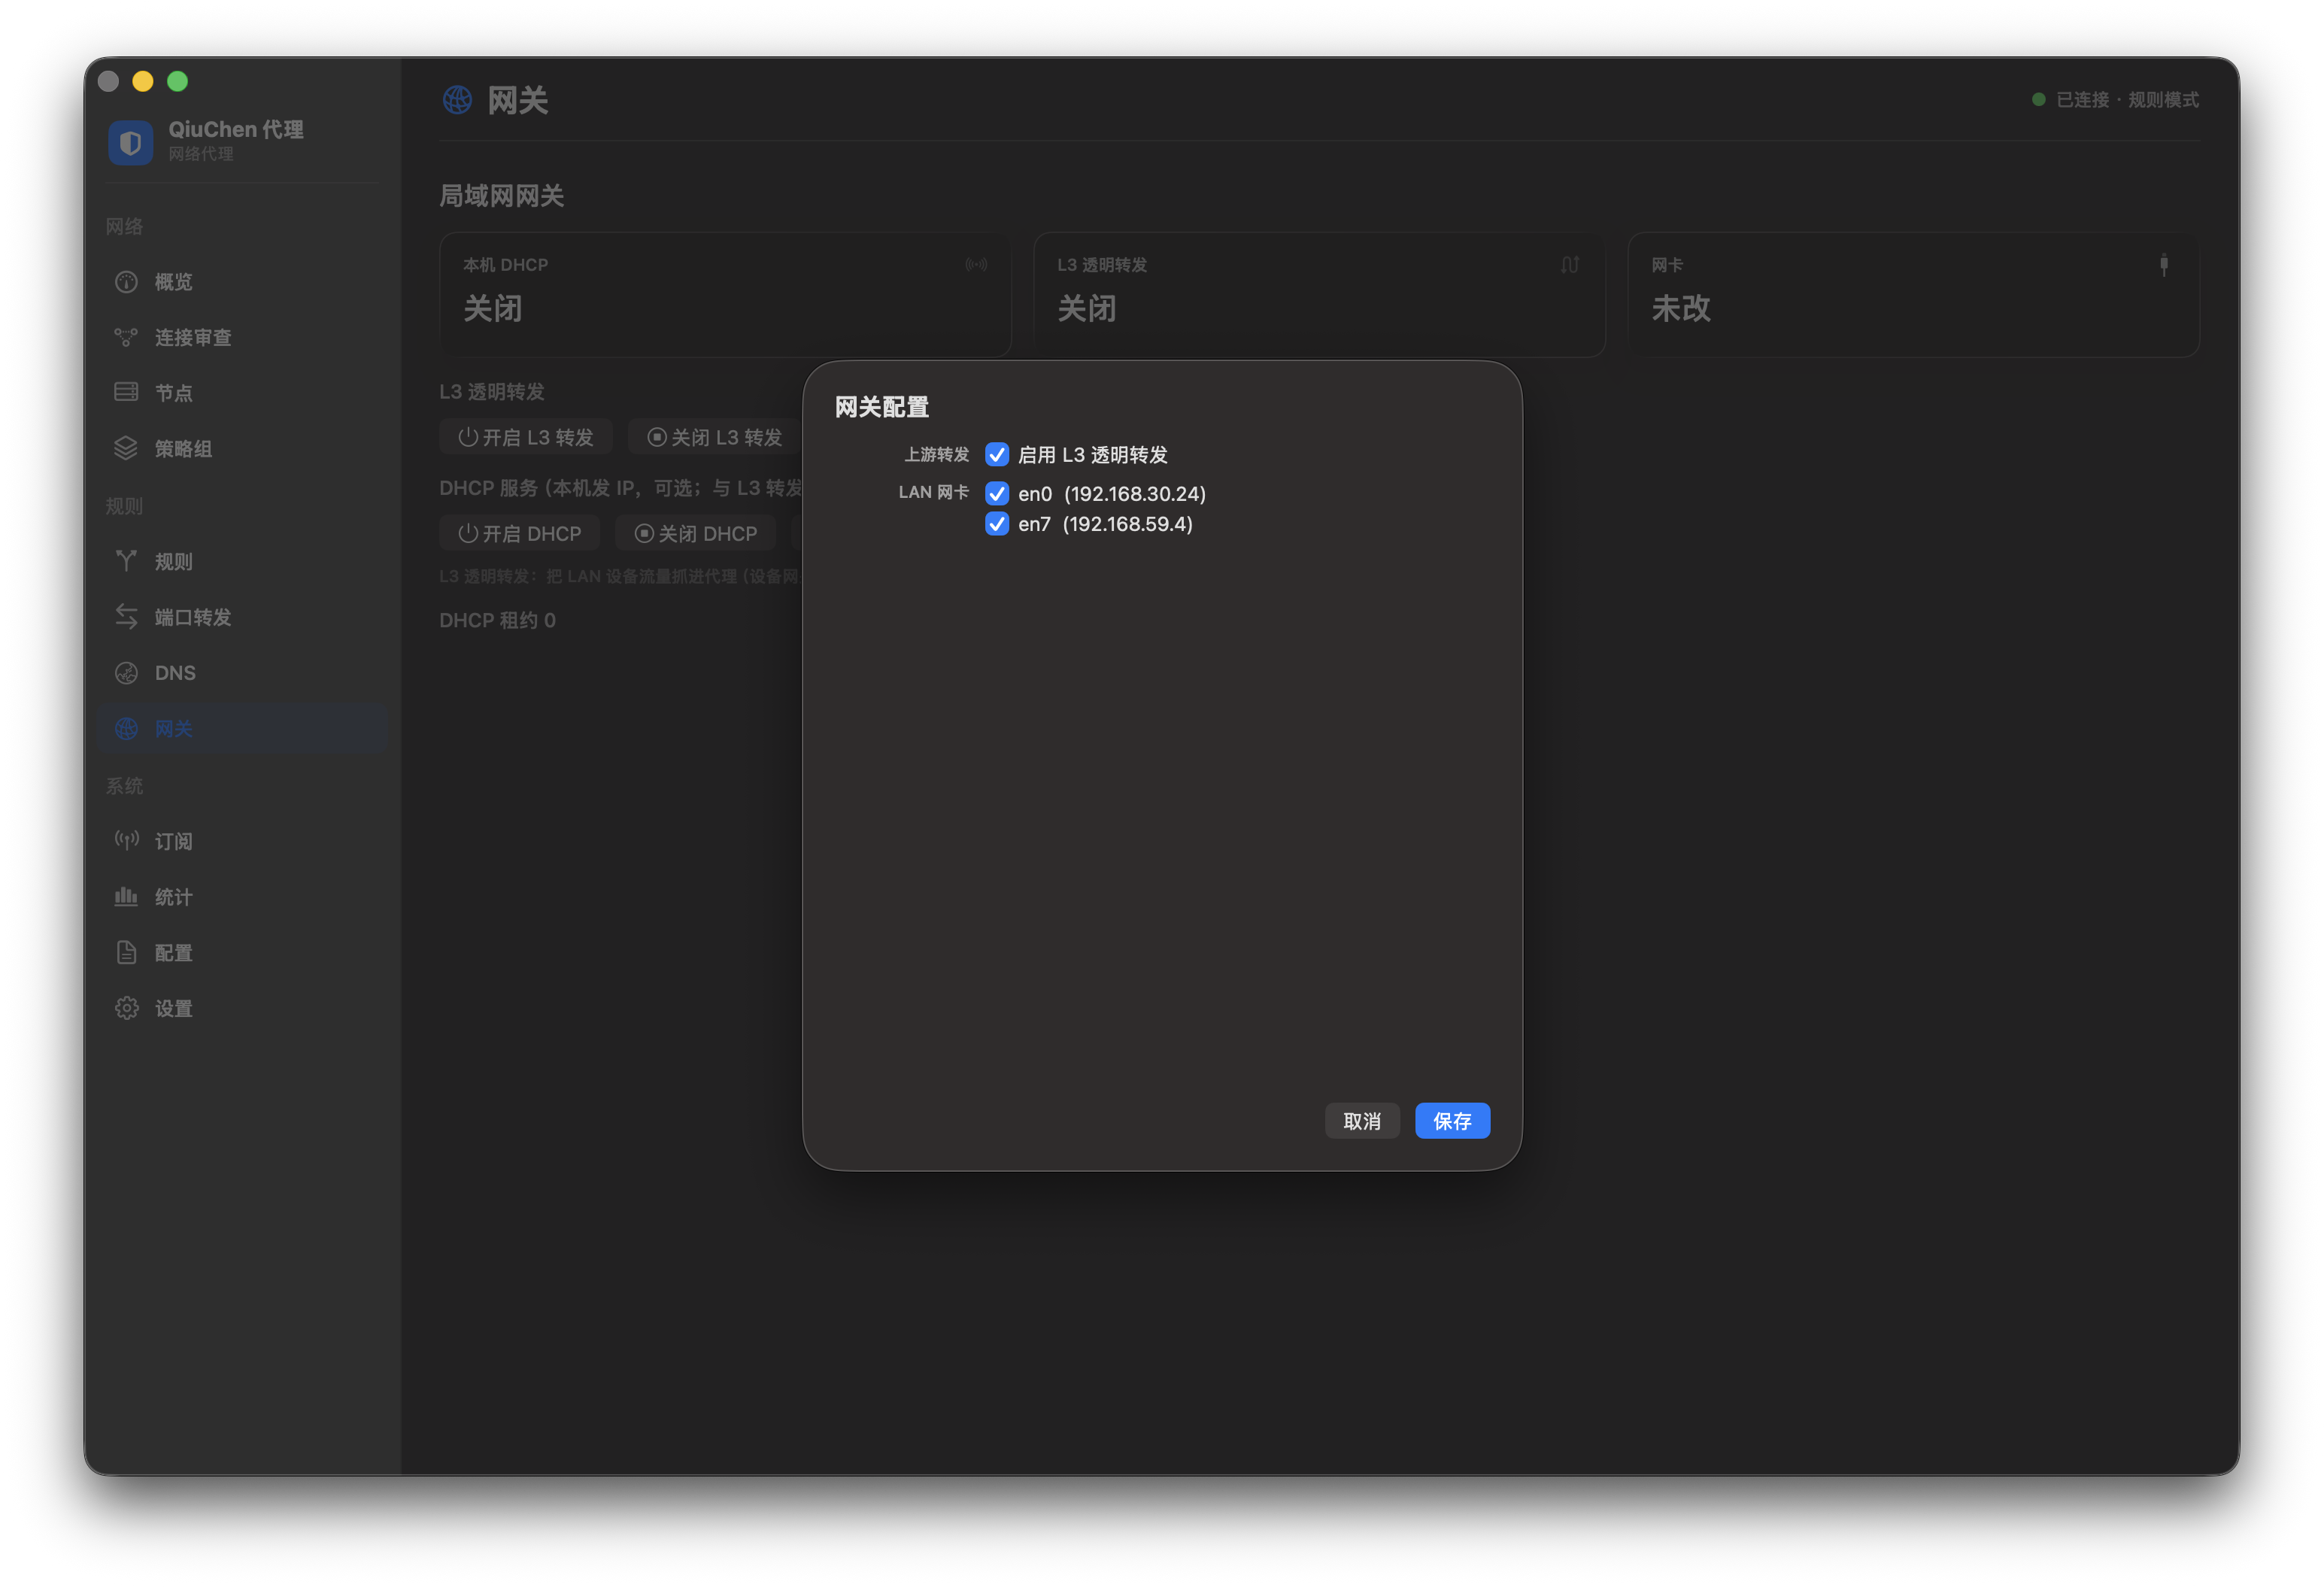
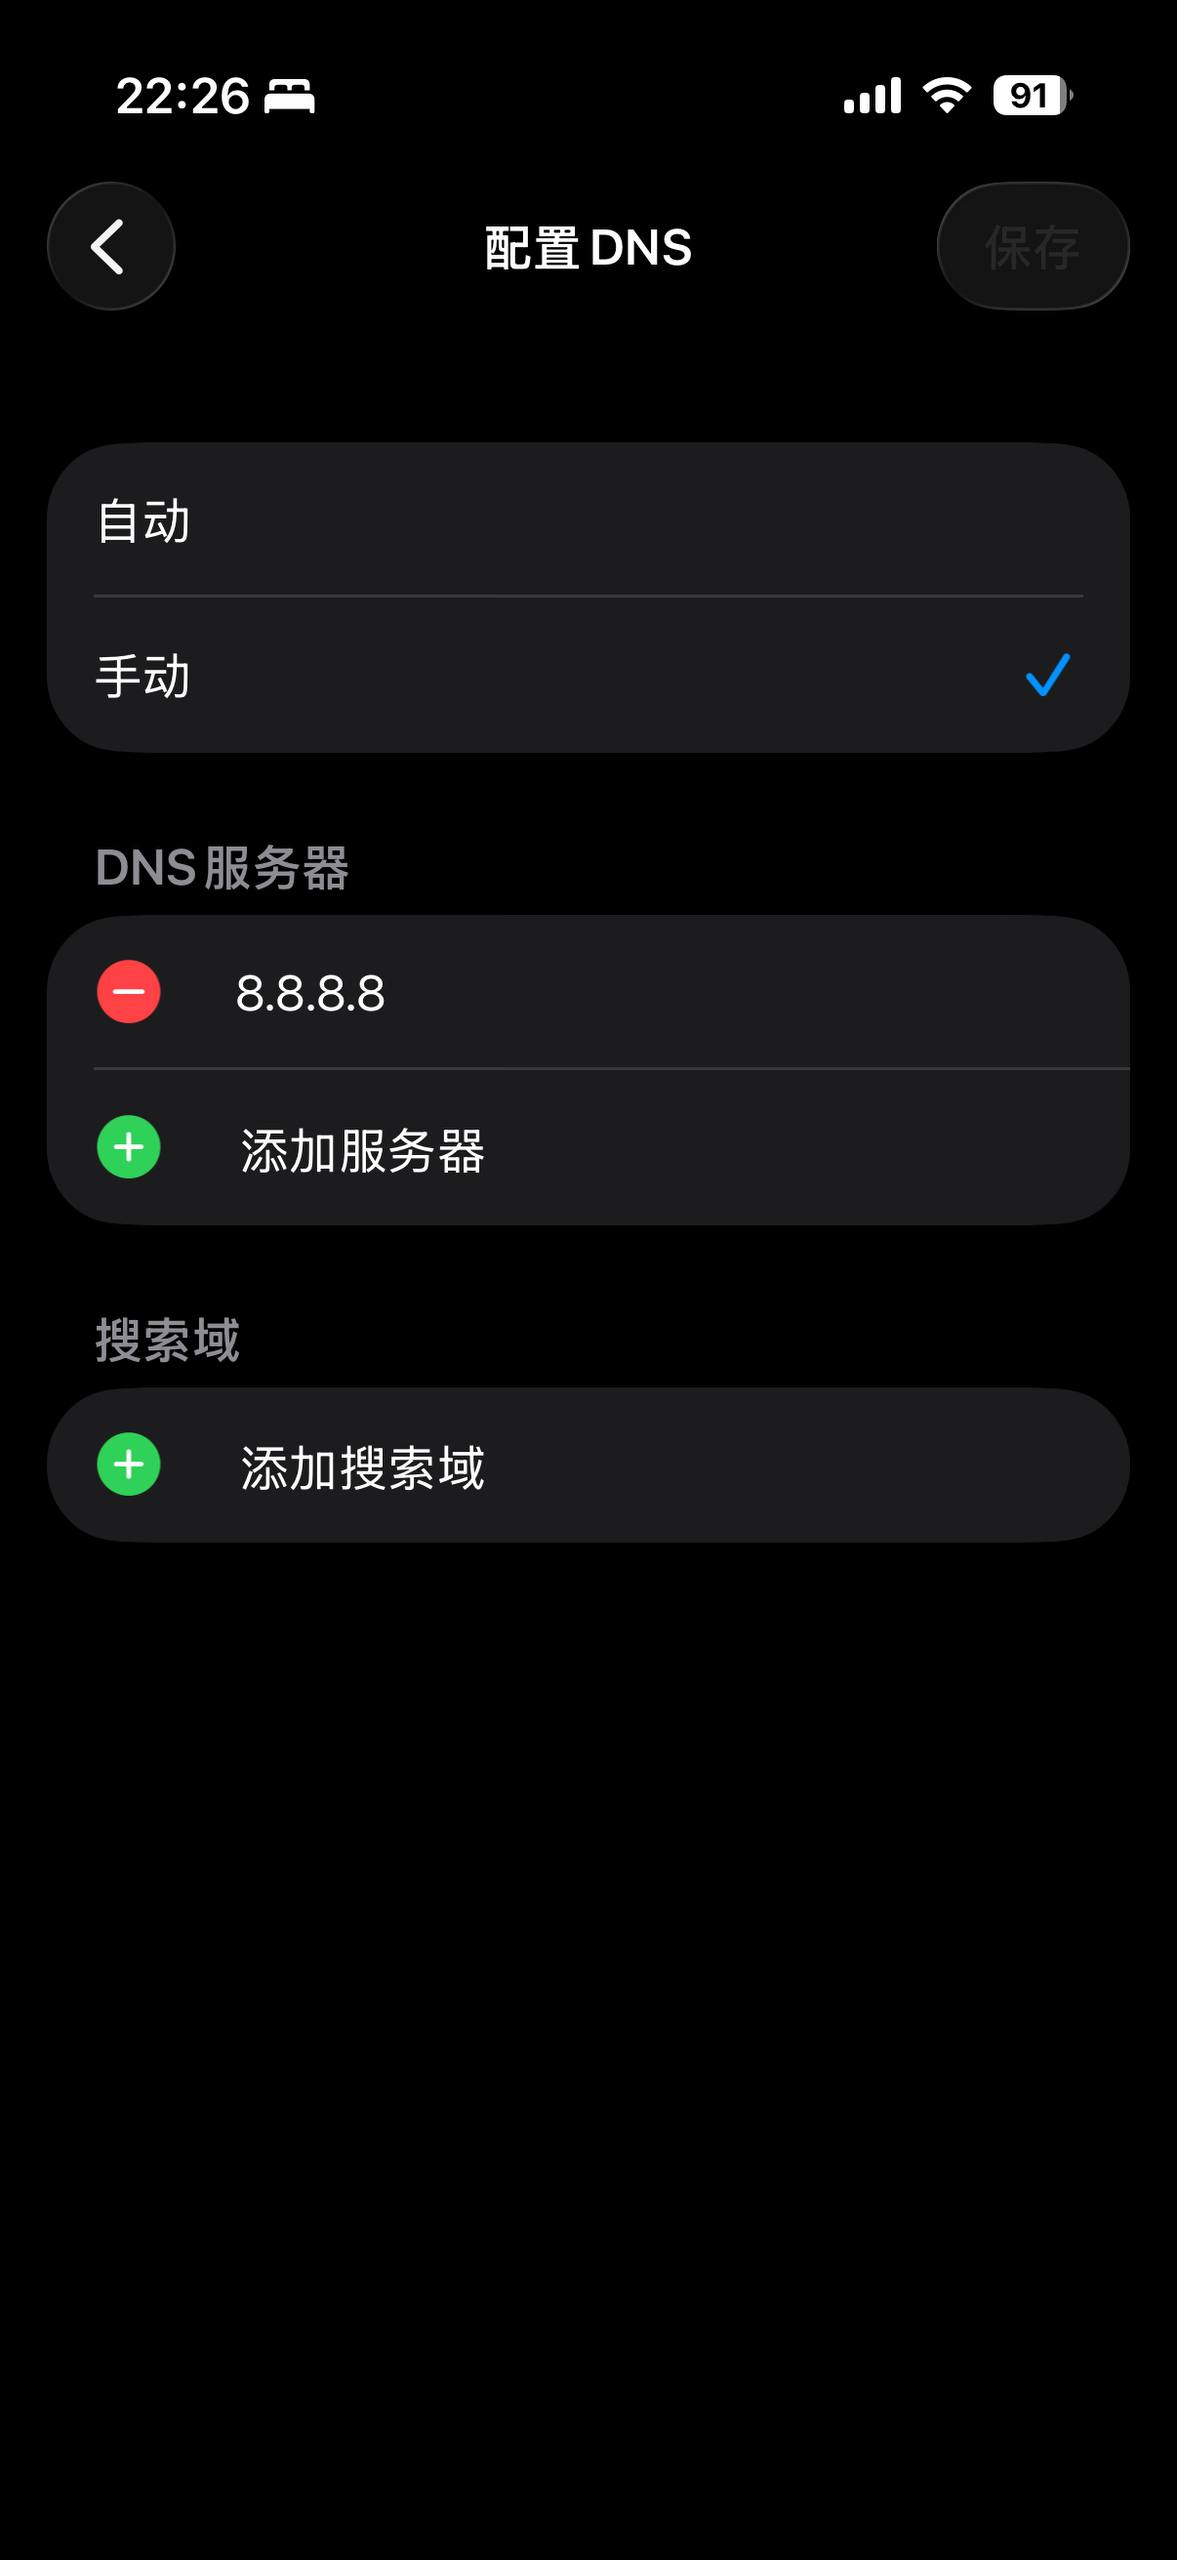
Then configure the network manually on the other device: set the gateway to the LAN IP of this Mac (the one with L3 forwarding on), and set DNS to any public DNS — all traffic will be taken over by the Mac.
For example, on iPhone, configure IPv4 manually — set the router (gateway) to the Mac's IP:
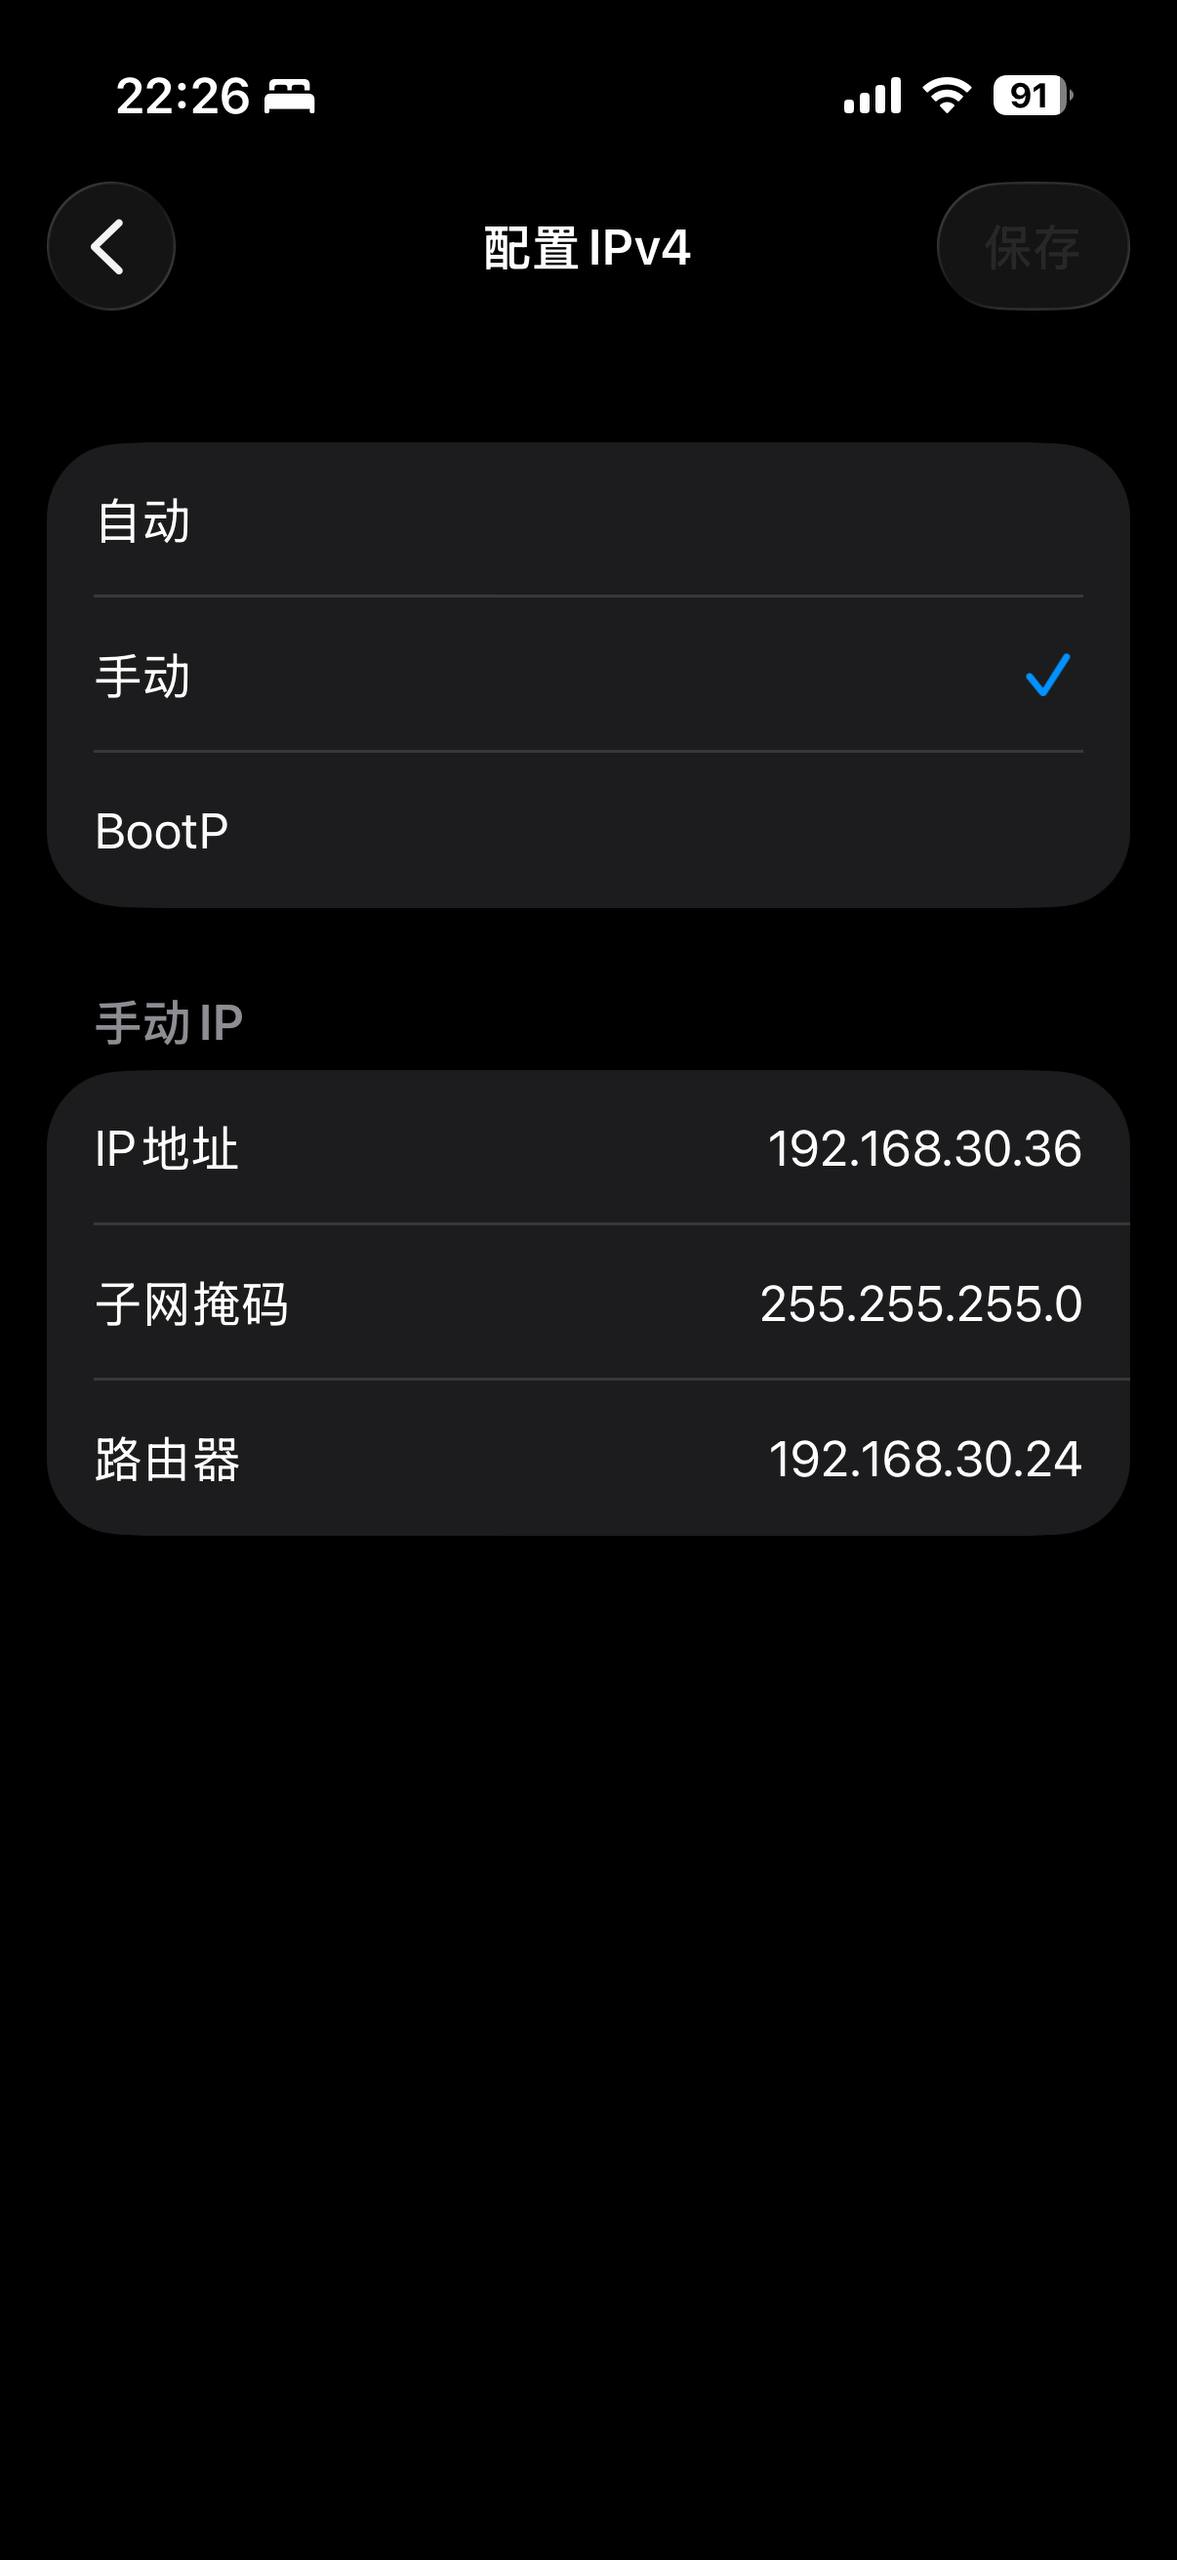
Set DNS to any public DNS (e.g. 8.8.8.8):
Once configured, on the Mac side you can see the "forwarded" traffic from the LAN device and its full decision chain (input → mode → matched rule → group selection → final state) in Connection Inspection.
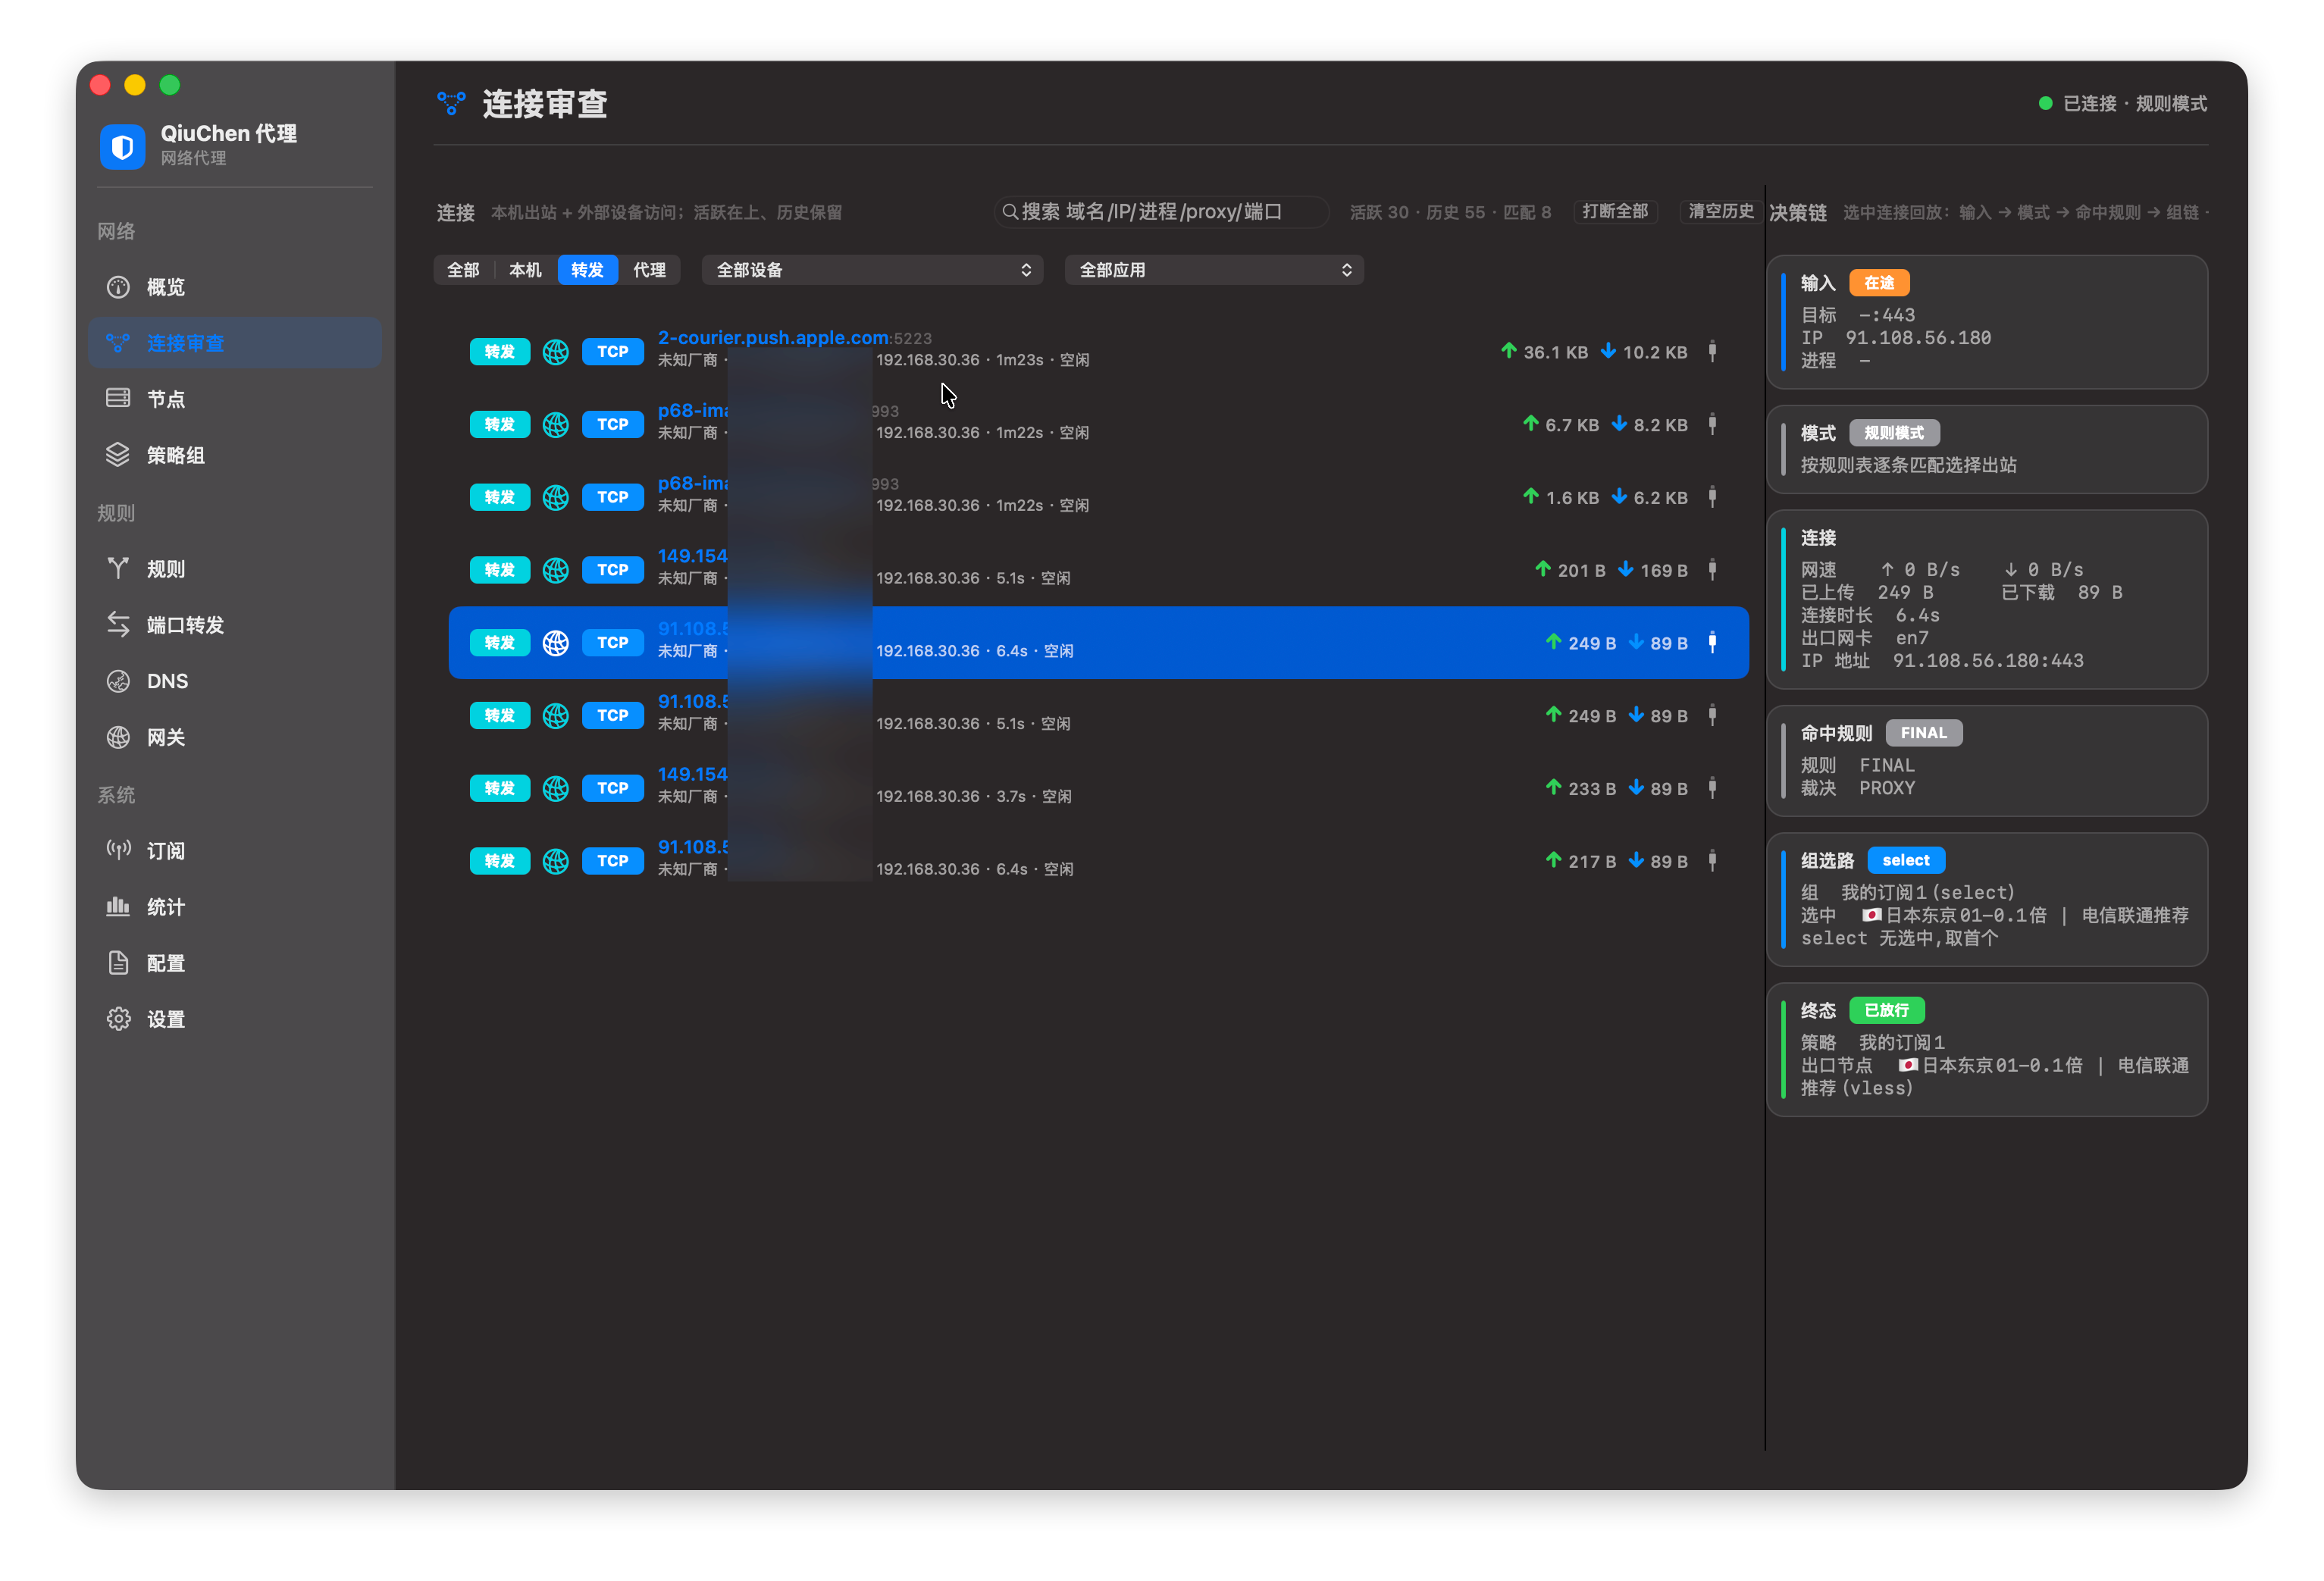
After takeover, all traffic from LAN devices still follows the rules to the corresponding proxy protocol.
Port Forwarding
There's a complete inbound / outbound port-forwarding management system built in — think of it as an ultra-lightweight frpc on your Mac, supporting advanced tricks like port mapping. Since the core is custom-built, almost any forwarding is possible.
Go to the Port Forwarding page, click "Add Forward", and fill in the protocol, listen port, target host and target port:
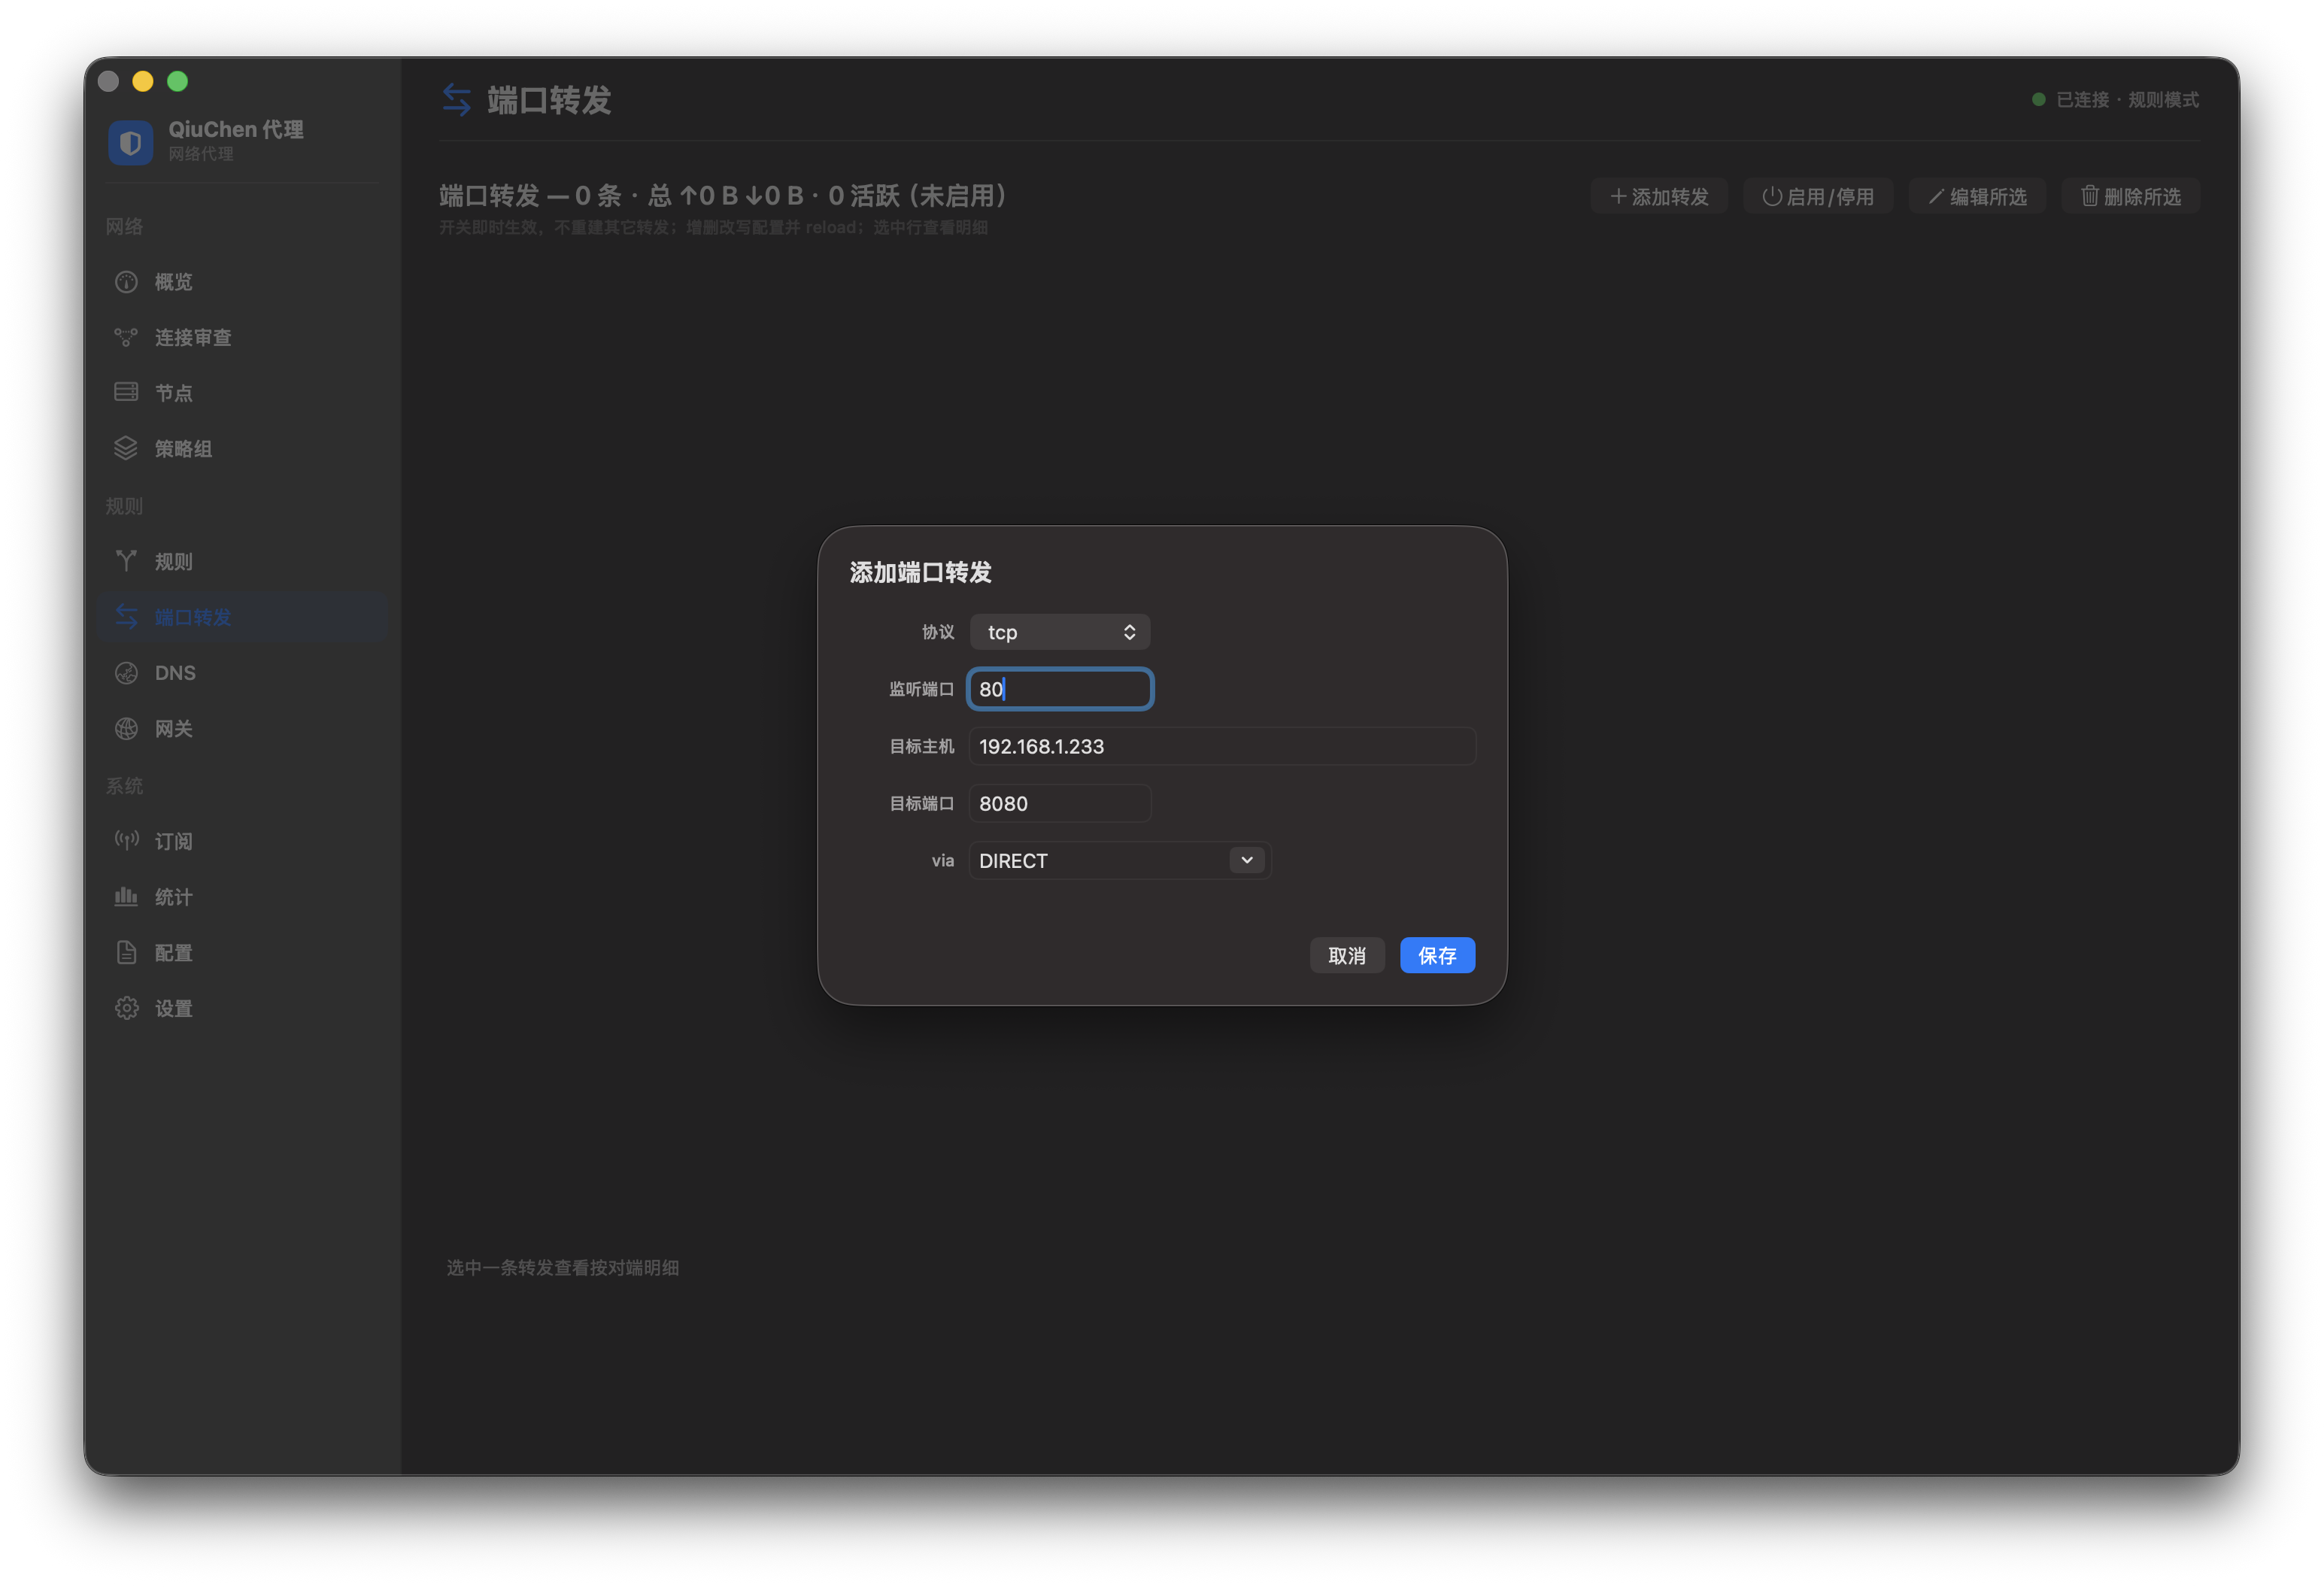
Using the screenshot as an example: listen on local port 80, and any packet other machines send to this IP's port 80 is forwarded to the target machine 192.168.1.233 port 8080. It works for LAN devices too, and the toggle is effective immediately without rebuilding other forwards.
Manually Adding Nodes
If you have a special individual node, you can add it manually to the Manual group on the Nodes page. Stable support for all protocols is implemented.
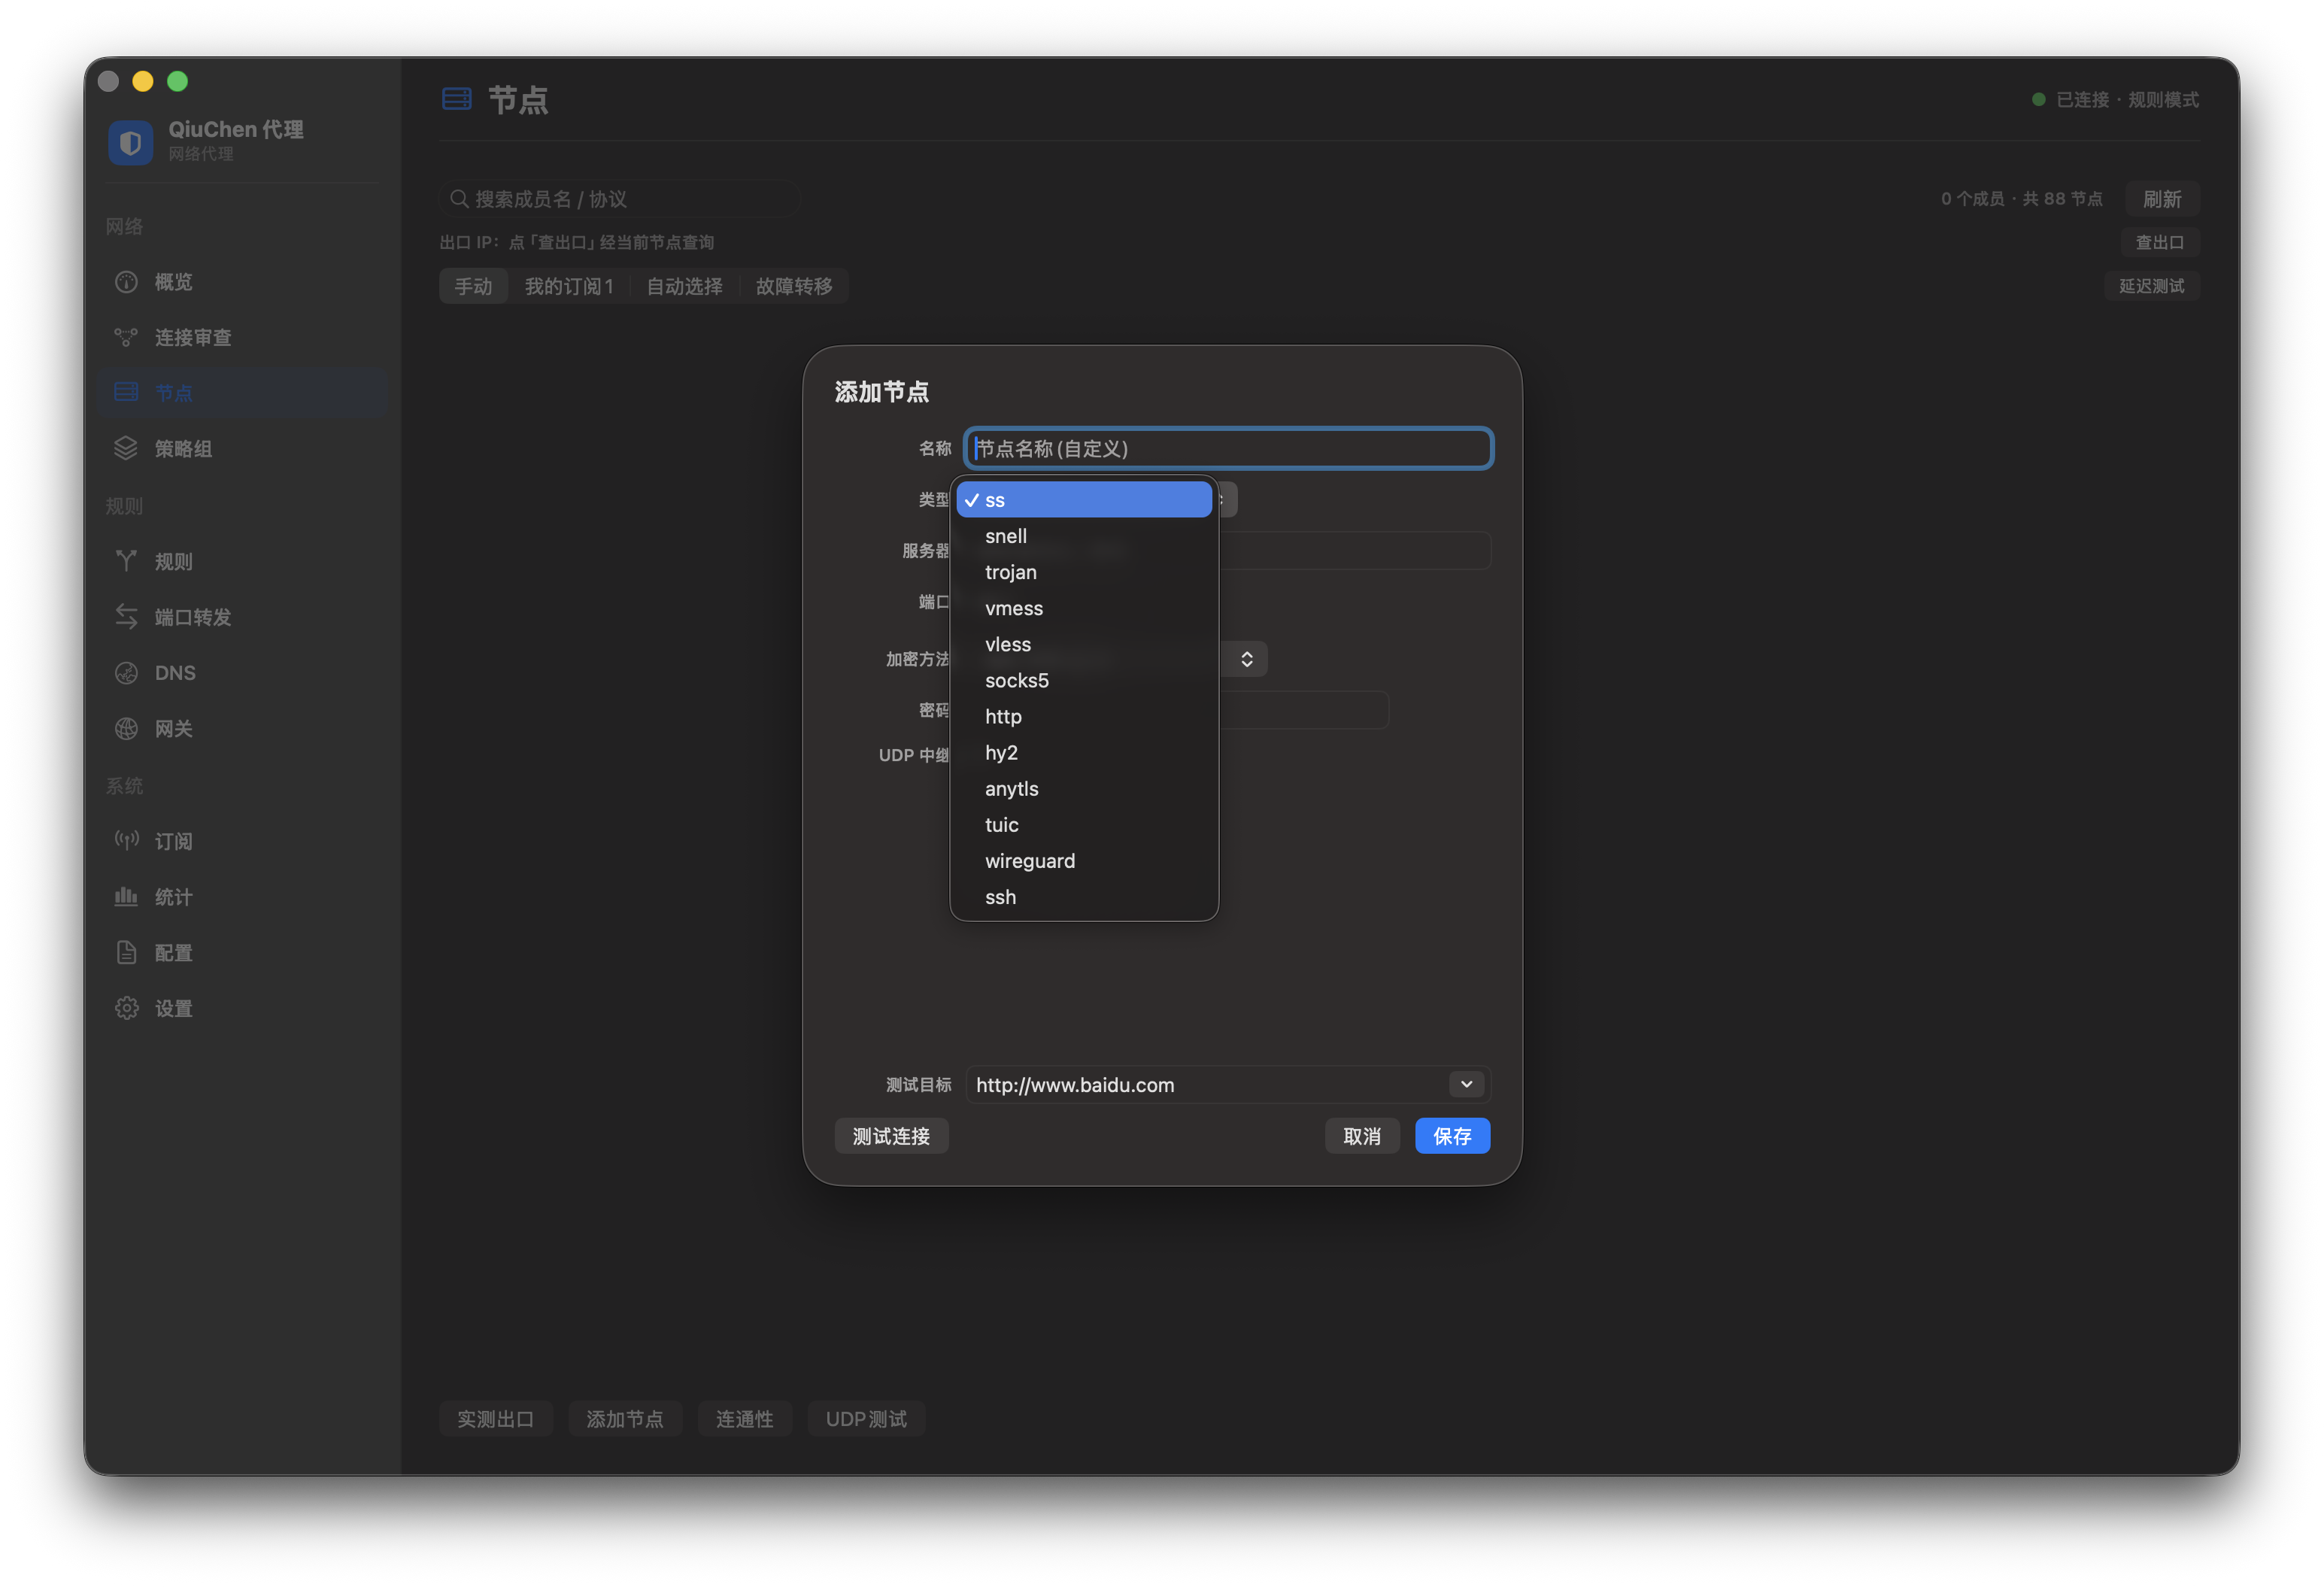
Supported protocols: ss / snell / trojan / vmess / vless / socks5 / http / hy2 / anytls / tuic / wireguard / ssh. Real-world stability still depends on continued feedback from everyone.
Core Capabilities
L3 Transparent Forwarding
- Implements L3 transparent proxy based on utun virtual network interface
- No need to manually configure system proxy
- Automatic detection in multi-NIC environments, independent IPv6 handling
- Decoupled from DHCP; no need to manually enter CIDR
Inbound Proxy
LAN devices can connect through the following methods:
- HTTP Proxy + SOCKS5 Proxy, combined port with automatic protocol detection
Outbound Protocols
| Protocol | Description |
|---|---|
| Trojan | TLS camouflage proxy, supports gRPC/WS/HTTP2/QUIC transport |
| VMess | V2Ray core protocol, supports AEAD encryption |
| VLESS | Lightweight protocol, supports Vision flow control camouflage + Reality TLS fingerprint concealment |
| Shadowsocks | Classic encrypted proxy, supports multiple encryption algorithms |
| Hysteria2 | High-speed proxy protocol based on QUIC |
| TUIC | Lightweight proxy protocol based on QUIC |
| Snell | Surge-specific proxy protocol |
| WireGuard | Modern VPN tunnel protocol |
| SSH | SSH secure tunnel |
| SOCKS5 over TLS | TLS-encrypted SOCKS5 |
| AnyTLS | Arbitrary TLS traffic camouflage |
Transport layer support: HTTP/2, HTTP/3 (QUIC), gRPC, WebSocket, TLS 1.3.
Salamander Obfuscation
Supports the Salamander obfuscation plugin for Shadowsocks.
Reality TLS Concealment
VLESS + Reality achieves TLS fingerprint camouflage without the need for a domain name or certificate.
Rule-Based Routing
- Domain rule matching
- IP CIDR rule matching
- Process-level traffic splitting (which app goes through which proxy)
- Supports rule groups and policy groups
DNS System
- Built-in DNS proxy server
- Fake IP mode: Reduces DNS query latency
- DNS requests are routed based on rules
Connection Inspection
- Device OUI vendor reverse lookup: Identify LAN device manufacturers
- Device type classification: Phone/Computer/IoT device
- App path resolution: Process-level traffic attribution
- Three traffic device categories: Local machine / LAN device / External
ARP Hardening
Gratuitous ARP prevents IP conflicts and maintains network stability in transparent gateway mode.
Usage Scenarios
Local Transparent Proxy
Once enabled, all local traffic is automatically taken over and routed according to rules.
LAN Gateway Mode
Use your Mac as a soft router: set other devices' (phone/tablet/PC) gateway to your machine's IP, or manually configure an HTTP/SOCKS5 proxy pointing to your machine. See Outbound Proxy & LAN Gateway for details.
Configuration
Configuration files are located in the ~/.qiuchenly/ directory:
- Supports hot reload (changes take effect automatically after modifying configuration)
- JSON format
- Contains node list, rule groups, policy groups, DNS settings
Notes
- QiuChen Proxy runs as an independent daemon separate from the main app
- If you encounter issues, try disabling and re-enabling QiuChenly Proxy in Manage → System Settings → Experimental Features
- Supports persistent hot toggle (maintains the last toggle state after restart)